

9 Velvet Ribbon Hair Looks for Festive Vibes
- Joao Nsita
- Dec 23, 2025
- 15 min read


There is a quiet, unassuming magic in a simple velvet ribbon. With its plush texture, deep lustre, and inherent touch of nostalgia, it possesses the unique ability to transform any hairstyle from everyday to utterly enchanting. As the festive season approaches, with its calendar of cozy gatherings, sparkling parties, and romantic evenings, this humble accessory has once again taken centre stage. A quick glance at the visual worlds of Pinterest, TikTok, and Instagram, under hashtags like #VelvetRibbon and #HairBow, reveals a full-blown renaissance. From simple, elegant ponytails to intricate, romantic updos, the velvet ribbon is the undisputed star of holiday hair trends.
What is it about this particular accessory that captures our collective imagination? It taps into a desire for timeless elegance and a touch of the personal. In an era of ever-changing, complex trends, the velvet ribbon feels classic, accessible, and deeply romantic. It evokes a sense of history—of Victorian heroines and Parisian chic—while feeling perfectly modern and fresh. It’s a small detail that makes a significant impact, adding a layer of thoughtful, festive charm to your look without requiring hours in front of a mirror. It’s the perfect finishing touch, a soft, luxurious punctuation mark on your holiday style.
This guide is your ultimate source of inspiration for incorporating this beautiful trend into your festive wardrobe. We have curated nine stunning velvet ribbon hair looks, presented in descending order from the most artfully complex to the most beautifully simple. We’ll provide detailed instructions for each style, offer tips for different hair types, and explore how each look can complement your festive plans. So, find your favourite spool of velvet, and let’s create some hair magic that is sure to spread cheer and turn heads.
If you find inspiration and joy in the content we create, please consider supporting our work. Your generosity allows us to continue crafting beautiful, in-depth articles that celebrate style, love, and connection. You can find ways to contribute at the top of the page or by simply scrolling down. We are so grateful for your support.
9. The Woven Velvet Ribbon Crown Braid
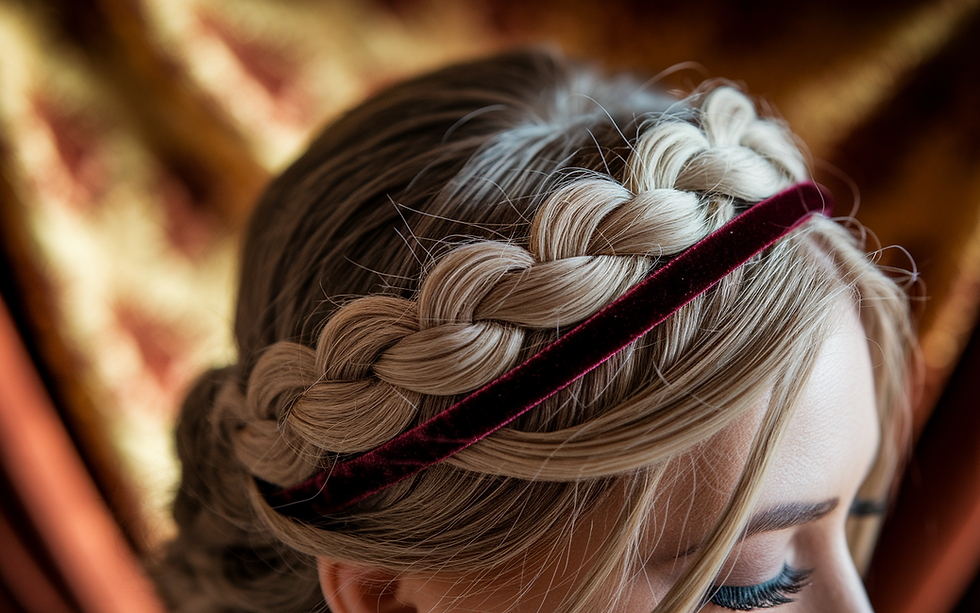
The Vibe: Ethereal, romantic, and fit for a fairytale queen. This is the most intricate look on our list, a true showstopper for a formal holiday event or a winter wedding. It’s a beautiful fusion of a classic braid and the luxurious texture of velvet.
The Look: A classic crown braid, or "halo braid," is woven around the head, but with a thin velvet ribbon intricately laced through one of the braid’s strands. The result is a stunning, textural halo with delicate flashes of velvet peeking through.
How to Achieve It:
Preparation is Key: Start with day-old hair, as it will have more grip than freshly washed hair. Apply a texturizing spray or dry shampoo from roots to ends to add volume and hold. A great option is the Living Proof Perfect Hair Day (PhD) Dry Shampoo.
Anchor the Ribbon: Part your hair where you’d like the braid to begin (a side part works well). Take a small section of hair near your part and, at the root, securely pin the end of a long, thin velvet ribbon (about 1/4 inch wide is ideal). The ribbon should be significantly longer than the circumference of your head.
Begin the Braid: Divide that first section of hair into three strands. Instead of a normal braid, you will incorporate the ribbon. Let the ribbon act as one of your three strands, or, for a more integrated look, combine it with one of the hair strands.
The Dutch or French Braid: Begin a Dutch braid (where you cross the strands under the middle strand) or a French braid (crossing over) around your hairline. As you braid, continue to pick up new sections of hair and add them to the outer strands, just as you would with a normal crown braid. Ensure the ribbon stays visible and doesn't get lost within the braid.
Complete the Circle: Continue the braid all the way around your head. Once you run out of hair to pick up, continue with a simple three-strand braid to the end and secure with a small, clear elastic.
Pin and Perfect: Wrap the tail of the braid around your head, tucking the end underneath the start of the crown braid. Secure it firmly with bobby pins. Gently pull on the edges of the braid (a technique called "pancaking") to make it look fuller and more romantic. You can find excellent visual tutorials for this technique on YouTube.
Finishing Touches: If any parts of the ribbon look uneven, you can use a bobby pin to gently adjust them. Finish with a strong-hold hairspray.
Perfect For: This style is a commitment, but it’s perfect for a black-tie Christmas party, a New Year's Eve gala, or for a winter bride. It’s an unforgettable look that is both regal and bohemian. This intricate and romantic style is reminiscent of the heroines in epic love stories, like those found in The 10 Best Fantasy Romance Books of All Time.
8. The Cascading Multi-Bow Ponytail

The Vibe: Playful, high-fashion, and wonderfully whimsical. This look, seen on runways and fashion influencers, turns a simple ponytail into a true statement piece using multiple bows.
The Look: A sleek ponytail is adorned with a series of small, identical velvet bows tied down its length, creating a beautiful, cascading effect.
How to Achieve It:
The Perfect Ponytail: The key to this look is a flawless base. For a sleek version, start by applying a smoothing cream to damp hair before blow-drying it straight. Gather your hair into a ponytail at your desired height (a mid-level or low pony works best) and secure it tightly with a hair tie. For extra polish, take a small strand of hair from the underside of the ponytail and wrap it around the hair tie, securing it with a bobby pin.
The "Bubble" Technique: To place the bows, you'll use the "bubble ponytail" method. Take a small, clear elastic and tie it about two to three inches down the length of your ponytail. Gently pull on the section between the two elastics to create a "bubble" shape.
Add the Bows: Take a short length of thin velvet ribbon and tie it into a neat, small bow around the clear elastic. Trim the tails of the bow so they are short and even.
Repeat: Continue this process down the length of your ponytail, creating evenly spaced "bubbles" and tying a velvet bow around each elastic. Depending on the length of your hair, you might have three to five bows.
Secure and Smooth: Once all your bows are in place, run a small amount of anti-frizz serum or hair oil over the lengths of the ponytail to tame any flyaways and add shine. A cult favourite is the Olaplex No. 7 Bonding Oil.
Perfect For: This is a fun, fashion-forward look for a festive night out with friends or a stylish holiday party. It’s unexpected and shows a playful sense of style. It’s a look that’s confident and a little bit cheeky, perfect for someone who enjoys the witty, smart heroines in The 10 Best Smart & Funny Romance Books of All Time.
7. The Velvet Bow-Adorned Chignon
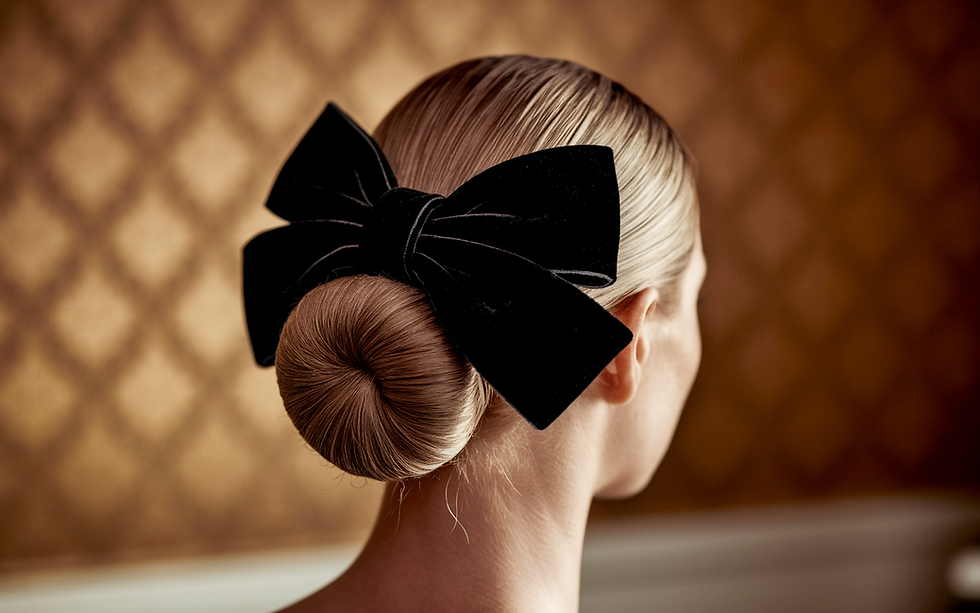
The Vibe: Timeless, elegant, and effortlessly chic. This is a classic look that whispers sophistication. It’s perfect for the woman who appreciates classic beauty with a modern, textural twist.
The Look: A classic low chignon or bun is secured at the nape of the neck, with a large, perfectly tied velvet bow placed just above or below the bun.
How to Achieve It:
Create the Base: This style works beautifully with both sleek and slightly messy buns. For a sleek look, gather your hair into a smooth, low ponytail. For a messier, more romantic look, leave a few face-framing tendrils out and gather your hair loosely.
Form the Chignon: Twist the ponytail into a rope, then coil it around the base to form a bun. Secure it firmly with bobby pins or spin pins. For a fuller-looking bun, you can use a hair donut.
The Bow Placement: There are two main options for placing the bow.
The Classic: Tie a large, floppy bow with a wide velvet ribbon (1-2 inches is ideal). Use bobby pins to secure the centre of the bow to your hair just above the chignon. This is a very classic, almost bridal look.
The Modern: Instead of a pre-tied bow, take a long piece of ribbon and wrap it around the base of the chignon once or twice, then tie the ends into a simple, elegant knot or a small bow at the bottom. Let the long tails of the ribbon hang down your back. This version feels more modern and relaxed. You can see this style all over Pinterest.
Set the Style: Finish with a light mist of flexible-hold hairspray to keep everything in place without looking stiff.
Perfect For: This is an incredibly versatile look. It’s elegant enough for a formal Christmas dinner or a holiday wedding, but simple enough for a festive office party. It’s a look of quiet confidence and grace, one that would suit the strong, intelligent heroines found in our list of The 10 Best Romance Books for Beginners.
6. The Half-Up 'Bridgerton' Bow

The Vibe: Romantic, feminine, and inspired by the dreamy aesthetics of Regency-era dramas. This look is all about softness, volume, and a touch of innocent charm.
The Look: The top section of the hair is gathered into a half-up style, often with some volume at the crown, and secured with a large, beautiful velvet bow.
How to Achieve It:
Build Volume and Texture: This style looks best with some soft waves and volume. Start by curling your hair with a large-barrel curling iron to create loose, romantic waves. A heat protectant is a must; TRESemmé Thermal Creations Heat Tamer Spray is a widely available and effective option.
Create the Pouf (Optional): For that 'Bridgerton'-inspired volume, gently backcomb the hair at the crown of your head. Smooth the top layer of hair over the backcombed section to hide the teasing.
Gather the Hair: Take the sections of hair from just above your ears on both sides and pull them back to meet at the centre of your head.
Secure with the Bow: This is where you have options.
Use a Bow Barrette: The easiest method is to use a pre-made velvet bow on a barrette or clip. Simply clip it over the gathered hair. Many beautiful options can be found on Etsy.
Tie it Yourself: Secure the gathered hair with a small, clear elastic. Then, take a long piece of velvet ribbon, thread it through the elastic, and tie it into a beautiful, floppy bow. This allows the tails to hang down elegantly with the rest of your hair.
Soften the Look: Gently pull out a few face-framing tendrils and curl them to soften the style.
Perfect For: This is the ultimate romantic holiday hairstyle. It’s perfect for a festive date night, a family gathering, or any occasion where you want to feel pretty and feminine. This look is practically begging to be worn while binge-watching a sweeping period drama.
A Night In with Romance: After perfecting your 'Bridgerton'-inspired hairstyle, why not immerse yourself in a world of romance on screen? With a subscription to a streaming service like Amazon Prime Video, you can watch a huge catalogue of romantic movies and shows, from historical dramas to modern love stories. It’s the perfect end to a day of festive self-care.
5. The Double Dutch Braids with Ribbon Weave

The Vibe: Youthful, charming, and a little bit whimsical. This is a sweet and playful way to incorporate ribbons into a more casual, everyday festive look.
The Look: Two classic Dutch braids are woven from the hairline to the nape of the neck, with a thin velvet ribbon woven into one strand of each braid. The look is finished with two small velvet bows at the end.
How to Achieve It:
Part and Prep: Part your hair down the centre from your forehead to the nape of your neck. Clip one side away.
Start the Braid: On the un-clipped side, take a section of hair at your hairline. Divide it into three strands. Begin a Dutch braid, crossing the outer strands under the middle strand and picking up new hair as you go.
Introduce the Ribbon: After the first couple of stitches of the braid, use a bobby pin to anchor a thin velvet ribbon at the root, hidden within the braid. Let the ribbon join one of the three strands and continue braiding, making sure the ribbon stays visible.
Finish and Repeat: Braid all the way down to the ends and secure with a clear elastic. Then, repeat the entire process on the other side of your head.
Add the Bows: Tie a small velvet bow around the clear elastic at the end of each braid. This hides the elastic and provides a charming finishing touch. This playful and sweet style is a great match for the heroines found in Our Top 10 Favorite Grumpy Sunshine Romance Books Of All Time.
Perfect For: This is a wonderful daytime holiday look. It’s perfect for a day of Christmas shopping, visiting a festive market, or a casual get-together with friends. It’s charming, practical (it keeps your hair out of your face!), and undeniably festive.
4. The Simple Braid with a Bow

The Vibe: Classic, elegant, and timeless. This look is the epitome of simple sophistication and proves that you don’t need a complex style to make an impact.
The Look: A simple, beautiful braid—be it a classic three-strand, a fishtail, or a thicker Dutch braid—is tied off at the end with a beautiful velvet ribbon.
How to Achieve It:
Choose Your Braid: This look works with any kind of braid. For a classic look, a simple three-strand braid over one shoulder is lovely. For a more bohemian vibe, try a loose, slightly messy fishtail braid. For a bold statement, a thick Dutch braid down the back is stunning.
Braid Your Hair: Create your chosen braid, leaving a couple of inches of hair at the end.
Secure with the Ribbon: Instead of a hair elastic, use a velvet ribbon to tie off your braid. Simply wrap it around the end of the braid a couple of times and tie it in a secure knot, or finish with a neat bow. Let the tails hang loose. The weight of the velvet helps the braid hang beautifully.
Add Fullness: Gently pancake the braid by pulling on the edges to make it look thicker and more romantic.
Perfect For: Literally any festive occasion. It’s polished enough for a party but simple enough for a casual day. This is a go-to style that always looks put-together and chic. The enduring, classic nature of this style is a perfect match for the timeless love stories in Our Top 10 Favorite Romance Books of All Time.
3. The High Ponytail with a Ribbon Wrap

The Vibe: Sleek, powerful, and sporty-chic. This is a modern, confident take on the ponytail, elevated for a festive occasion with a touch of luxurious velvet.
The Look: A high, Ariana Grande-style ponytail is secured, with a long velvet ribbon wrapped elegantly around its base.
How to Achieve It:
Sleek is Key: This style looks best with super-sleek hair. Use a smoothing serum and a flat iron to get your hair as straight as possible.
The High Pony: Tilt your head back and use a boar bristle brush to gather your hair into a very high ponytail at the crown of your head. Secure it extremely tightly with a strong hair tie, like a Bungee Cord Elastic, which is a pro secret for a secure, lifted pony.
Wrap It Up: Take a long, thin velvet ribbon. Anchor one end by tucking it under the hair tie. Then, wrap the ribbon tightly and neatly around the base of the ponytail, covering the hair tie completely. Continue wrapping down for about an inch or two.
Secure and Finish: Secure the end of the ribbon by tucking it under the wrapped section or using a small bobby pin. Let the remaining long tail of the ribbon hang down with the ponytail. Finish with a strong-hold hairspray. This powerful and confident look is perfect for a heroine who knows what she wants, much like the characters in The 10 Best Action Romance Books of All Time.
Perfect For: A New Year's Eve party or a festive night out on the town. It’s a bold, high-fashion look that is sure to make a statement.
2. The Classic Low Ponytail with a Floppy Bow

The Vibe: Effortless, chic, and sophisticated. This is perhaps the most iconic and accessible velvet ribbon hairstyle, seen everywhere from Parisian streets to holiday parties.
The Look: A low ponytail, either sleek or with soft texture, is tied at the nape of the neck with a long, elegant velvet ribbon, finished with a simple knot or a floppy bow.
How to Achieve It:
Gather Your Pony: Create a low ponytail at the nape of your neck. You can make it super sleek by brushing your hair back smoothly, or you can create a softer look by leaving out some face-framing pieces and gathering the hair loosely. Secure with a clear elastic.
Tie the Ribbon: Take a long piece of velvet ribbon (at least a yard for a dramatic effect). Tie it around the elastic. You can tie it in a simple, chic knot and let the two long tails hang down, or you can tie it into a large, floppy, slightly imperfect bow.
The Finishing Touch: The beauty of this style is its simplicity. The long, luxurious tails of the ribbon are the main event, creating beautiful movement as you walk.
Perfect For: Any and every festive occasion. It’s the perfect way to elevate a simple sweater and jeans for a casual gathering, and it’s elegant enough to pair with a cocktail dress for a formal party. It’s a look of understated elegance, a beautiful match for a poignant love story like those found in The 10 Best Romance Books That Will Make You Cry.
1. The Single Velvet Strand Accent

The Vibe: Minimalist, subtle, and surprisingly chic. This is the easiest and most understated way to wear the trend, proving that even the smallest touch of velvet can make a big impact.
The Look: A single, thin velvet ribbon is used to tie back a very small section of hair, or is simply tied around the end of a single braid or pigtail.
How to Achieve It:
The Face-Framing Twist: Take a small, one-inch section of hair from near your temple. Twist it back away from your face and secure it behind your ear with a small bobby pin. Then, simply tie a tiny velvet bow over the bobby pin to hide it.
The Pigtail Accent: For long hair, this is incredibly sweet. Divide your hair into two low pigtails. Secure them with clear elastics, then tie a small velvet ribbon around each one.
The Braid End: Create one single, small, accent braid within your loose hair. Tie it off at the end with a tiny piece of velvet ribbon.
Perfect For: This is a perfect look for adding just a hint of festive cheer to your everyday style. It’s subtle enough for the office but special enough to feel festive. It’s a beautiful, simple gesture, a reminder that sometimes the smallest details make the biggest difference, in style and in love. It’s a style that speaks to the power of a single, perfect moment, a feeling often captured in the paranormal fated-mates stories of The 10 Best Paranormal Romance Books of All Time.
Conclusion
The velvet ribbon is far more than just a simple accessory; it is a thread of timeless elegance that we can weave into our modern lives. Its beauty lies in its versatility and its accessibility. With just a single spool of ribbon, you can create a multitude of looks that range from the regally complex to the beautifully simple, each one imbued with a sense of festive romance and thoughtful style.
As you navigate the joyful chaos of the festive season, we hope these nine looks have inspired you to play, to create, and to find a style that makes you feel beautiful and confident. Whether you choose a dramatic woven crown or a simple, chic ponytail, embracing the velvet ribbon trend is a wonderful way to add a personal, celebratory touch to your look. It’s a small gesture that speaks volumes, a soft, luxurious reminder of the magic and romance of the holiday season.
We pour our hearts into creating content that inspires and brings joy. If you've enjoyed this article, please consider supporting our work. Your contribution, no matter the size, allows us to continue celebrating all things style, romance, and connection. You can find ways to donate at the top of the page or by scrolling down. Thank you from the bottom of our hearts.

Frequently Asked Questions (FAQs)
What width of velvet ribbon is best for hair? It depends on the style. For weaving into braids (Looks 9 & 5), a thin ribbon (1/4 to 3/8 inch) is best. For tying large, floppy bows (Looks 7, 6, & 2), a wider ribbon (1 to 2 inches) makes a bigger statement.
How do I keep a ribbon from slipping out of my hair? The key is to anchor it to something. Always secure your hair first with a hair elastic or bobby pins, and then tie the ribbon around that anchor point. For extra security, you can use a bobby pin to discreetly pin the knot of the ribbon to your hair.
Where can I buy good quality velvet ribbon? You can find a wide variety of velvet ribbons at craft stores like Jo-Ann or Michaels, fabric stores, and online on sites like Etsy, where you can often find unique colours and high-quality, real velvet options.
How do I prevent the ends of my ribbon from fraying? You can quickly and carefully pass the cut end of a synthetic velvet ribbon through the flame of a lighter to melt and seal it. For natural velvets, a small dab of clear nail polish or Fray Check (a liquid seam sealant) on the very edge will work. Always cut the ends at a sharp angle for a clean look.
Can I wear a velvet ribbon if I have short hair? Absolutely! A small velvet bow on a clip can be used to pin back a small section of a bob or a pixie cut. You can also tie a thin velvet ribbon around your head as a simple, chic headband.
What colours are best for a festive look? Classic festive colours like deep burgundy, forest green, and navy blue are always stunning. Metallics like gold or silver are perfect for New Year's Eve. A simple, elegant black velvet ribbon is incredibly chic and versatile.
How do I clean a velvet ribbon? It's best to spot-clean a velvet ribbon very gently with a damp cloth and a tiny bit of mild soap. Avoid soaking it, as this can crush the pile. Let it air dry completely.
What's the best way to tie a perfect bow? The trick to a perfect, symmetrical bow is to make two "bunny ear" loops and then tie them together, just like you would tie your shoes. Pull the loops to adjust the size and tightness. There are many slow-motion video tutorials on YouTube that are incredibly helpful.
How long should my ribbon be? For a classic ponytail bow (Look 2), start with a piece that is at least a yard (36 inches) long. This will give you enough length for a floppy bow and long, dramatic tails. For smaller accents, you'll only need a few inches.
I'm not very good at doing my own hair. Which style is the easiest? The Single Velvet Strand Accent (Look 1), the Classic Low Ponytail (Look 2), and the Simple Braid with a Bow (Look 4) are all incredibly easy, beginner-friendly styles that take only a minute or two to create but look incredibly chic.

.jpg)


.jpg)


Comments