






10 Wet Hairstyles for Busy Mornings That Are Actually Easy to Do

Updated: Sep 1
10 Wet Hairstyles for Busy Mornings That Are Actually Easy to Do
Mornings can be chaotic when you are trying to get dressed, make breakfast, find your keys and somehow make your hair look presentable at the same time. If you have just stepped out of the shower and do not have time for a full blow-dry, these easy wet hairstyles can turn damp hair into a polished look in only a few minutes.
Wet hairstyles work especially well because you are styling the moisture rather than fighting against it. Instead of rushing through heat styling, you can smooth, twist, braid or pin damp hair into a hairstyle that looks intentional while allowing your hair to continue drying naturally.
The important thing is to start with hair that is damp rather than dripping wet. Wet hair can be more fragile and stretchy, so gently squeeze out excess water with a microfiber towel or soft cotton T-shirt before styling and avoid pulling your elastics painfully tight.
A lightweight leave-in conditioner, smoothing cream, mousse or small amount of gel can help control frizz without making your hair feel crunchy. You will also want a brush or wide-tooth comb, a few snag-free elastics, bobby pins and perhaps a claw clip nearby before you begin.
These hairstyles work for commuting, school runs, workdays, gym mornings, summer days and those mornings when the snooze button won. Some are polished enough for the office, while others lean relaxed, romantic or sporty.

You can also adapt each hairstyle to your own texture. Straight and wavy hair may need a little smoothing product, while curly and coily hair may benefit from extra leave-in conditioner and gentler finger styling to preserve the natural curl pattern.
If you love quick warm-weather hairstyles, you can also explore our guide to 12 Breezy Summer Hair Trends You'll Love in 2025.
Here are 10 wet hairstyles you can actually learn and recreate before you run out of the door.
You Might Like This
For more quick hairstyles that work when time is short or the weather is hot, continue with these practical guides. They include everything from heat-friendly updos to scarves, braids and simple summer hairstyles.
1. Sleek Low Bun

Best for: Straight, wavy, curly or medium-to-long hairTime: About 3–5 minutes
You need: Brush or comb, leave-in conditioner or gel, hair elastic and bobby pins
The sleek low bun is one of the easiest wet hairstyles to learn because damp hair naturally helps create the smooth finish. It can look professional enough for work while taking considerably less time than straightening or blow-drying your entire head.
How to Do a Sleek Low Bun
Step 1: Gently towel-dry your hair until it is damp instead of dripping wet. Apply a small amount of leave-in conditioner or smoothing cream through the lengths, then use whatever remains on your hands to smooth the top.
Step 2: Decide where you want your part. A centre part gives the bun a clean modern appearance, while brushing everything straight back creates a stronger slicked-back effect.
Step 3: Brush your hair toward the nape of your neck and secure it in a low ponytail. Hold the ponytail with one hand while smoothing bumps with the other before tightening the elastic.
Step 4: Twist the ponytail from the base toward the ends. Wrap that twist around the elastic to form a circular bun, then tuck the ends underneath.
Step 5: Secure the bun with two or three bobby pins. Slide the pins inward toward the centre of the bun rather than placing them straight across the surface so they stay hidden.
Make It Look Better
Use a toothbrush or small edge brush with a tiny amount of gel to smooth flyaways around the hairline. If you want something more decorative, add one gold pin, minimalist barrette or small ribbon at the base.
Avoid pulling the ponytail extremely tight, especially while your hair is damp. You want the hairstyle secure enough to stay in place without creating unnecessary tension around your hairline.
For more inspiration, explore this low bun hairstyle guide from Byrdie.
This hairstyle also transitions beautifully into evening styling, making it useful if you are looking for elegant hairstyles for a date night.
2. Wet French Twist

Best for: Medium-to-long hairTime: About 5 minutesYou need: Comb, bobby pins, smoothing cream and optional decorative clip
A French twist looks complicated when you see the finished hairstyle, but the basic technique is surprisingly simple once you understand where the hair needs to go. Damp hair can actually make the style easier because the strands stay together instead of becoming fluffy while you twist them.
How to Do a Wet French Twist
Step 1: Comb your damp hair straight back and apply a small amount of smoothing cream through the mid-lengths and ends. Avoid applying too much product near your roots because you still want some natural movement.
Step 2: Gather all your hair at the back as though you were creating a low ponytail, but do not secure it with an elastic. Hold the hair slightly to one side of the centre of your head.
Step 3: Begin twisting the ponytail upward. As you twist, guide the hair toward the centre so the twist begins sitting vertically against the back of your head.
Step 4: Continue rolling the hair inward toward your scalp. You should begin seeing the classic folded French-twist shape developing while the loose ends point upward.
Step 5: Tuck the remaining ends down inside the twist. Insert several bobby pins vertically along the folded edge, pushing them underneath the twist so they grip the hair underneath.
Make It Look Better
Do not worry if the style is not completely perfect. Allowing one or two pieces around the face to stay slightly loose can make the hairstyle softer and less formal.
A pearl clip or metallic barrette can cover any area where your pins are visible. It also turns a five-minute practical hairstyle into something polished enough for meetings, dinners or events.
For more hot-weather hairstyles that keep your hair away from your neck, see our guide to 10 Easy Updos to Beat the Summer Heat.
3. Double Wet Braids
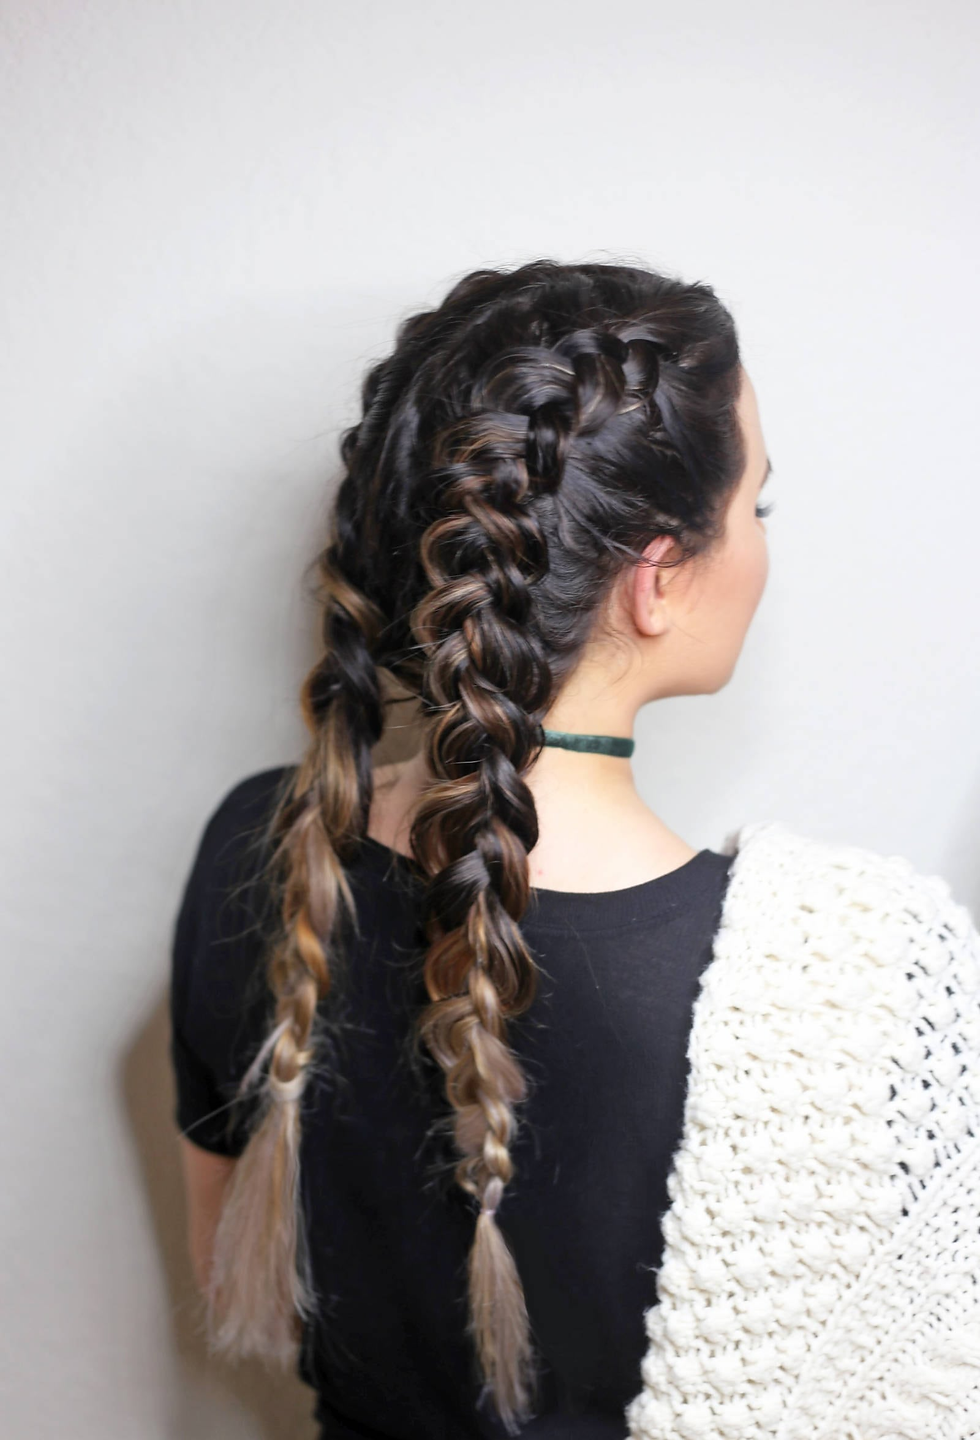
Best for: Medium-to-long hair, especially thick or wavy hairTime: About 5–8 minutesYou need: Comb, two snag-free elastics and leave-in conditioner
Double braids are one of the most practical choices when you know you are going to have a busy day. They keep damp hair organised, reduce tangling and can leave you with soft waves when you eventually take them out.
How to Do Double Wet Braids
Step 1: Work a lightweight leave-in conditioner through your damp hair. Use a wide-tooth comb to remove any tangles gently, starting at the ends and gradually working upward.
Step 2: Create a centre part from your forehead all the way to the nape. Divide the hair into two equal sections and temporarily secure one side so it does not mix with the other.
Step 3: Divide the loose section into three pieces. Cross the right section over the middle, then cross the left section over the new middle section.
Step 4: Continue alternating sides until you reach the ends. Keep your hands relatively close to the braid so the sections remain organised without pulling tightly against your scalp.
Step 5: Secure the end with a soft elastic and repeat on the opposite side. Gently loosen each braid with your fingertips if you want a fuller, more relaxed appearance.
Want French Braids Instead?
Begin with three smaller sections near your hairline rather than starting at your neck. Each time you cross a side section over the middle, pick up a little additional hair before crossing it.
Continue adding hair until you reach the nape, then finish with a normal three-strand braid. It takes slightly longer, but it keeps more of the hair securely contained.
These braids are particularly useful for active summer days. You can find more ideas in our guide to 10 Pool-Ready Braids That Stay Perfect All Day.
4. High Wet Ponytail

Best for: Medium-to-long hairTime: About 2–3 minutesYou need: Brush, soft elastic and lightweight smoothing product
When you genuinely have almost no time, the high wet ponytail is difficult to beat. The secret is positioning it correctly and smoothing the hair before securing it so that it looks intentional rather than rushed.
How to Do a High Wet Ponytail
Step 1: Apply a small amount of smoothing cream or leave-in conditioner through your damp hair. Brush gently from the hairline toward the crown.
Step 2: Tilt your head slightly backward instead of flipping your head completely upside down. Gather your hair approximately level with the upper part of your ears.
Step 3: Hold the ponytail firmly with one hand. Use your other hand and brush to smooth the front, sides and back until you are happy with the shape.
Step 4: Secure the ponytail with a soft, snag-free elastic. Loop it only as many times as necessary to hold the hairstyle securely without creating painful tension.
Step 5: Take a thin strand from underneath the ponytail and wrap it around the elastic. Secure that small strand underneath with a bobby pin for a more polished finish.
Make It Look Better
Gently smooth the top with your palms after securing the ponytail. If you prefer something softer, loosen the hair slightly around your temples rather than creating an ultra-slick finish.
People with shorter hair can adapt the idea into a mid-height or low ponytail. You can also explore our 9 Low-Maintenance Short Summer Cuts.

5. Twisted Wet Crown

Best for: Shoulder-length or longer hairTime: About 4–6 minutesYou need: Leave-in cream, bobby pins and optional decorative pins
The twisted crown gives damp hair a soft romantic appearance without requiring you to know how to braid. It is especially useful if you want your hair away from your face while still leaving most of the length down.
How to Do a Twisted Wet Crown
Step 1: Create your normal part and take a section of hair about two inches wide near your right temple. Divide that section into two smaller pieces.
Step 2: Twist those two pieces around each other while directing them backward toward the crown. Pick up a small additional piece of hair after each twist if you want the style to sit closer to your head.
Step 3: When the twist reaches the back of your head, temporarily secure it with a bobby pin. Repeat exactly the same process on the left side.
Step 4: Bring both twists together at the back. Cross one over the other and pin them securely so the bobby pins sit underneath the hair.
Step 5: Leave the remaining hair loose to air-dry naturally. Alternatively, gather the loose lengths into a low bun if you need all of your hair completely off your neck.
Make It Look Better
Pull very gently at the outside edges of each twist to make them appear fuller. A few small decorative pins placed around the crown can turn the hairstyle into something suitable for brunch, a date or an outdoor event.
The look works especially well with relaxed, romantic outfits and fits naturally into a bohemian hairstyle aesthetic.
6. Slicked-Back Mermaid Hair

Best for: Short, medium or long hairTime: About 3–5 minutesYou need: Wide-tooth comb, styling cream or gel and optional hair oil
If you would rather leave your hair completely down, turn the dampness into part of the hairstyle. Slicked-back hair creates a deliberate wet-look finish around the crown while allowing the lengths to stay loose and gradually air-dry.
How to Do Slicked-Back Wet Hair
Step 1: Towel-dry your hair until the lengths feel damp but are no longer dripping. Comb through gently to remove tangles.
Step 2: Place a small amount of styling cream or flexible gel between your palms. Smooth it from your hairline backward over approximately the first third of your hair.
Step 3: Use a comb to direct the front sections away from your face. Follow the natural shape of your head rather than pressing every section completely flat.
Step 4: Tuck the hair securely behind your ears. Add another tiny amount of product around your temples if short pieces continue escaping.
Step 5: Leave the lengths relatively product-free so they can move naturally while drying. If needed, smooth one drop of hair oil over the ends after the hair has dried further.
Avoid This Common Mistake
Do not coat your entire head with heavy gel. The goal is controlled shine near the crown with softer lengths, not hair that feels hard from roots to ends.
For an extra-glossy finish, you can try Color Wow Pop & Lock High Gloss Finish on Amazon.
7. Claw Clip Half-Up Twist

Best for: Medium-to-long hairTime: About 2 minutesYou need: Large claw clip and optional leave-in conditioner
This might be the easiest hairstyle in the entire guide. A claw clip immediately keeps the front of damp hair away from your face while leaving enough of the length loose to continue air-drying.
How to Do a Half-Up Claw Clip
Step 1: Apply a little leave-in conditioner through your damp lengths and gently detangle your hair. Decide whether you want a centre part, side part or everything swept backward.
Step 2: Place your thumbs just above your ears and move them backward until they meet. Lift all the hair above this line away from the lower section.
Step 3: Gather that top section at the back of your head. Twist it upward approximately one or two turns.
Step 4: Place a large claw clip vertically over the twist. Make sure the clip grips the twisted section and some hair underneath without pinching your scalp.
Step 5: Allow the loose ends to fall over the clip or fan them slightly with your fingers. Leave the bottom half of your hair completely loose.
Make It Look Better
Choose a clip that is actually large enough for your hair density. Fine hair may need a smaller clip with closely spaced teeth, while thick hair usually needs a larger, stronger design.
A matte tortoiseshell, cream, brown or black clip makes this simple hairstyle look particularly polished. You can also smooth damp lengths with Moroccanoil Treatment.
8. Bubble Ponytail

Best for: Medium-to-long hairTime: About 5 minutesYou need: Several small elastics, brush and smoothing cream
If braiding has never been your talent, the bubble ponytail gives you a similar statement effect with almost no technique required. The bubbles are simply created by adding elastics at regular intervals and gently expanding the hair between them.
How to Do a Bubble Ponytail
Step 1: Brush your damp hair into either a high, middle or low ponytail. Secure it using a soft elastic that can support the weight of your hair comfortably.
Step 2: Move approximately two or three inches down the ponytail and add another small elastic. The exact distance depends on the length of your hair.
Step 3: Hold the elastic in place with one hand. With your other hand, gently pull outward on the hair between the first two elastics to create a rounded bubble.
Step 4: Move another two or three inches down and repeat. Continue adding elastics and creating bubbles until you reach the end of your ponytail.
Step 5: Look at the entire hairstyle and adjust each bubble so they appear reasonably even. Do not pull aggressively because damp hair is more vulnerable to stretching and breakage.
Make It Look Better
Clear elastics create a minimal appearance, while black elastics make the sections more graphic. You can also use soft coloured elastics if you want the hairstyle to feel more playful.
Use a little Bed Head by TIGI After Party Smoothing Cream through the ponytail if you need additional frizz control.
9. Two-Strand Rope Braid

Best for: Long or medium hairTime: About 3–5 minutesYou need: Two elastics and optional mousse or styling cream
A rope braid looks intricate but only requires two sections instead of three. The trick is twisting both pieces in one direction before wrapping them around each other in the opposite direction.
How to Do a Rope Braid
Step 1: Pull your damp hair into a ponytail and secure it. A high ponytail creates a sportier finish, while a low ponytail looks softer and more sophisticated.
Step 2: Divide the ponytail into two equal sections. Hold one section securely in each hand.
Step 3: Twist the right section clockwise several times until it becomes firm. Twist the left section clockwise in exactly the same direction.
Step 4: Now cross the two twisted pieces around each other counterclockwise. This opposite movement is what prevents the rope braid from immediately unravelling.
Step 5: Continue twisting the individual sections clockwise and wrapping them together counterclockwise as you work toward the ends. Secure everything with another soft elastic.
Make It Look Better
Keep fairly even tension throughout the braid so one side does not become dramatically thicker than the other. Once finished, you can gently loosen sections if you want a softer rope effect.
A lightweight mousse can provide additional grip without requiring a heavy gel. Kenra Volume Mousse 12 is one option for creating flexible control.
10. Low Messy Chignon

Best for: Medium-to-long hairTime: About 3–5 minutesYou need: Hair elastic, bobby pins and smoothing cream
The messy chignon is the answer when you want something softer than the sleek low bun. It deliberately allows a little movement and imperfection, making it especially forgiving when your morning hair refuses to cooperate.
How to Do a Low Messy Chignon
Step 1: Apply a small amount of air-dry cream through your damp lengths. Gather your hair loosely at the nape of your neck without brushing every bit of texture away.
Step 2: Begin creating a low ponytail with an elastic. On the final loop, stop before pulling the ends completely through so you create a folded loop of hair.
Step 3: Spread that loop slightly with your fingers to create a wider bun shape. Do not worry about making both sides perfectly symmetrical.
Step 4: Take the loose ends hanging beneath the loop and wrap them gently around the elastic. Tuck the ends underneath and secure them with one or two bobby pins.
Step 5: Gently loosen a few sections around the bun. If desired, pull out one small strand near each side of your face for a softer finish.
Make It Look Better
Do not deliberately pull lots of damp hair loose around your face because those sections may dry in awkward shapes. Keep the looseness subtle and adjust more once your hair has partially dried.
An air-dry cream can help keep the texture controlled. Bumble and bumble Don't Blow It Fine Hair Styler is designed specifically for enhancing air-dried hair.
How to Make Wet Hairstyles Work Better
Start every wet hairstyle with towel-dried rather than soaking hair. A microfiber towel or soft cotton T-shirt can remove water without the vigorous rubbing that often contributes to frizz and tangles.
Detangle carefully before styling. Begin near the ends and gradually work upward with a wide-tooth comb or detangling brush rather than forcing a brush through knots from the roots downward.
Use less styling product than you think you need. Begin with a small amount of leave-in conditioner, mousse, styling cream or gel and add more only where necessary, because too much product can leave air-dried hair heavy or sticky.
Think about how your hair will dry inside the hairstyle too. Braids can leave waves, rope braids can create spiral texture and buns may create bends, so choose your morning style partly according to how you want your hair to look when you eventually release it.
Most importantly, avoid making damp hairstyles painfully tight. Wet hair can be more fragile, so soft elastics, gentle tension and snag-free accessories are better choices when you are styling damp strands regularly.
Conclusion
Busy mornings do not have to mean choosing between wet hair and being late. These 10 easy wet hairstyles give you practical ways to work with damp hair while creating something that looks deliberate, polished and appropriate for the rest of your day.
Start with the easiest options if you are new to styling your own hair. The claw-clip half-up style, high ponytail and sleek low bun require very little technique, while the French twist and rope braid become considerably easier after you have practised them a couple of times.
Your hair texture should guide your choice as well. Braids and twists can control thicker lengths, while claw clips, ponytails and low buns can be adapted easily for finer hair.
The biggest improvement, however, comes from understanding the steps rather than simply looking at a finished photograph. Once you learn where to divide, twist, cross, wrap and pin the hair, you can recreate these hairstyles without needing to follow a tutorial every morning.
Keep your favourite accessories beside your mirror and practise two or three styles when you are not rushing. The next time you leave the shower with ten minutes until you need to leave, you will already know exactly what to do.
10 FAQs About Wet Hairstyles for Busy Mornings
1. Is it okay to style wet hair?
You can style damp hair, but handle it gently because hair can be more vulnerable when wet. Remove excess water first and avoid extremely tight elastics, aggressive brushing or repeatedly pulling the same areas. Damp rather than dripping hair is usually easier to control for these hairstyles.
2. Which wet hairstyle is the fastest?
The half-up claw clip and high ponytail can both take around two minutes once you know what you are doing. The sleek low bun takes only slightly longer because you need to twist and pin the ponytail. Keep your elastics, clips and brush together to make the process even faster.
3. Which wet hairstyle is easiest for beginners?
Start with the half-up claw clip, low bun or bubble ponytail because none requires complicated braiding. Once those feel comfortable, move to the rope braid and twisted crown. The French twist is probably the style that benefits most from a little practice.
4. Can I braid wet hair?
Yes, but work with damp rather than soaking-wet hair and avoid pulling the braid excessively tight. A loose or moderately secure braid can keep long hair organised while it dries. When you remove it later, you may also be left with soft waves.
5. Can curly hair use these hairstyles?
Many of these styles can be adapted for curly and coily hair. Use a leave-in conditioner for slip and consider finger styling instead of brushing if you want to preserve your curl pattern. Avoid forcing curls completely flat unless the sleek appearance is specifically what you want.
6. How do I stop wet hairstyles becoming frizzy?
Begin with gently detangled hair and use a small amount of leave-in conditioner, smoothing cream or anti-frizz product. Avoid repeatedly touching the hair while it dries because that can disturb the developing texture. A smoother towel-drying technique can also make a noticeable difference.
7. What should I use instead of tight hair ties?
Look for snag-free elastics, soft scrunchies or spiral-style ties depending on the hairstyle. You need enough grip to keep the hairstyle secure without creating painful pressure around your scalp. Claw clips can also be useful when you want to reduce the amount of tension altogether.
8. Which hairstyle works best if I want waves later?
Double braids usually create the most predictable soft waves once completely dry. Rope braids can create a more twisted or spiral texture, while buns often leave larger bends. The final result will vary according to your natural hair texture, how damp it was and how tightly you styled it.
9. Should I use gel on soaking wet hair?
For these quick hairstyles, towel-dried damp hair is generally much easier to work with than dripping hair. Apply a small amount of gel mainly where you need hold or smoothing instead of saturating every strand. Too much product can make the finished hairstyle look heavy as it dries.
10. What products should I keep ready for busy mornings?
A good basic kit includes leave-in conditioner, smoothing cream or light gel, a wide-tooth comb, soft elastics, bobby pins and a reliable claw clip. You do not need ten styling products to create these hairstyles. Keeping a small collection together will make getting ready considerably faster.
You Might Like This
If you enjoyed these quick wet hairstyles, these guides can help you build an entire collection of easy looks for hot weather, holidays and busy mornings. Save your favourites so you always have another hairstyle ready when you need to get out of the door quickly.


.jpg)




.jpg)


