



14 Delicious Frozen Ice Cream Desserts Perfect for Summer Parties
- Joao Nsita
- 3 minutes ago
- 18 min read

You are staring down a long list of party guests and a short list of dessert ideas that will not melt into a puddle before anyone gets a bite.
These 14 frozen ice cream desserts solve that problem completely, giving you crowd-pleasing, genuinely easy recipes that hold up beautifully at barbecues, picnics, birthdays, and pool parties without demanding hours of fuss in a hot kitchen. Every single one is built for summer entertaining, designed to be made ahead, and guaranteed to disappear fast.
Let's start 👇

💛 Love this kind of content? Help keep it going: Support That Love Podcast
If you love this, check out: Delicious Homemade Ice Cream Cake Recipe (Better Than Store-Bought!)
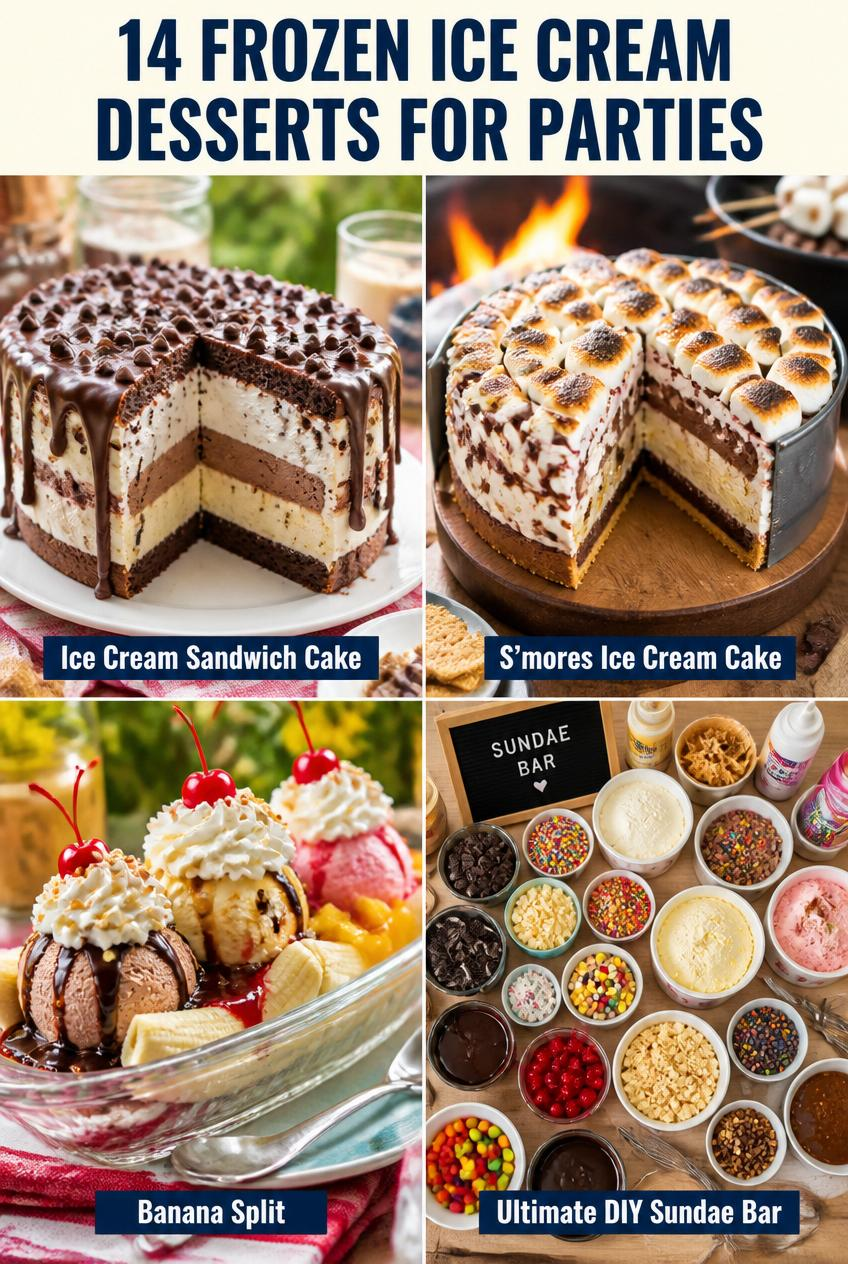
1. Ice Cream Sandwich Cake

Prep Time: 20 minutes | Freeze Time: 4 hours (or overnight) | Servings: 12–15
This is the dessert every summer party needs in its rotation: zero baking, five ingredients, and a finished look so impressive that nobody believes how little effort it actually took. Layers of store-bought ice cream sandwiches are stacked into a casserole dish, blanketed in whipped topping and hot fudge, and frozen into clean, cuttable slices.
Ingredients:
24 ice cream sandwiches
16 oz tub whipped topping (such as Cool Whip), thawed
1 cup hot fudge sauce, slightly warmed
1/2 cup crushed Oreos or chocolate sandwich cookies
Sprinkles or mini chocolate chips, for garnish
Equipment Needed: 9x13-inch casserole dish, offset spatula, plastic wrap
Instructions:
Line the bottom of the dish with a single layer of ice cream sandwiches, trimming to fit if needed.
Spread half the whipped topping evenly over the sandwiches.
Drizzle half the hot fudge sauce over the whipped topping.
Add a second layer of ice cream sandwiches.
Top with the remaining whipped topping, smoothing with an offset spatula.
Drizzle the remaining fudge sauce and sprinkle with crushed cookies and sprinkles.
Cover tightly with plastic wrap and freeze for at least 4 hours, or overnight for the cleanest slices.
Let sit at room temperature for 5–10 minutes before slicing with a sharp knife.
Serving Suggestions: Slice into squares and serve on chilled plates for a birthday party centrepiece, or cut into smaller bites for a potluck dessert table.
Storage Tips: Cover tightly and store in the freezer for up to 2 weeks. Wrap individual slices in plastic wrap for easy grab-and-go portions.
Recipe Variations: Swap chocolate sandwiches for strawberry shortcake bars for a fruity version, or use caramel sauce instead of fudge for a salted caramel twist.
Shop This Recipe:
🎙️ Stream a love story while your dessert sets — That Love Podcast is live now: thatlovepodcast.com/episodes
2. Brownie Sundae

Prep Time: 10 minutes | Cook Time: 25 minutes (brownies) | Servings: 9
A warm, fudgy brownie meets cold, melting vanilla ice cream and a flood of hot fudge — this is the single most requested dessert at any backyard gathering, and it takes almost no skill to pull off beautifully.
Ingredients:
1 box brownie mix (plus required oil, water, eggs) or homemade brownie batter
2 pints vanilla ice cream
1 cup hot fudge sauce
1/2 cup whipped cream
1/4 cup chopped pecans or walnuts
Maraschino cherries
Equipment Needed: 8x8-inch baking pan, ice cream scoop, microwave-safe bowl
Instructions:
Bake brownies according to package directions in an 8x8-inch pan. Let cool slightly.
Cut brownies into squares while still slightly warm.
Place each brownie square in an individual bowl.
Top with one to two scoops of vanilla ice cream.
Warm the hot fudge sauce in the microwave for 20–30 seconds and drizzle generously.
Finish with whipped cream, chopped nuts, and a cherry on top.
Serving Suggestions: Serve immediately while the brownie is still slightly warm for the best contrast against the cold ice cream. Great for a make-your-own sundae station.
Storage Tips: Bake and store brownies (unfrozen) for up to 3 days at room temperature in an airtight container, then assemble sundaes fresh.
Recipe Variations: Use blondies instead of brownies, swap in salted caramel sauce, or add a shot of espresso to the brownie batter for a mocha version.
Shop This Recipe:
3. Banana Split

Prep Time: 10 minutes | Servings: 4
The original sundae — and still one of the most satisfying desserts you can put in front of a crowd. A split banana, three flavors of ice cream, and a generous tumble of toppings makes for a dessert that always disappears first.
Ingredients:
4 ripe bananas, split lengthwise
1 scoop each vanilla, chocolate, and strawberry ice cream per serving
1/2 cup hot fudge sauce
1/2 cup strawberry sauce
1/2 cup crushed pineapple
Whipped cream
Chopped peanuts
Maraschino cherries
Equipment Needed: Banana split boat dishes (or long oval plates), ice cream scoop
Instructions:
Split each banana lengthwise and place both halves along the sides of a banana split dish.
Add one scoop each of vanilla, chocolate, and strawberry ice cream between the banana halves.
Drizzle hot fudge sauce over the chocolate scoop, strawberry sauce over the strawberry scoop, and crushed pineapple over the vanilla scoop.
Top with whipped cream, chopped peanuts, and a cherry on each scoop.
Serve immediately.
Serving Suggestions: Set up a DIY banana split station for parties so guests can build their own — kids especially love this format.
Storage Tips: Best assembled and eaten immediately. Pre-split bananas can sit for 15–20 minutes before browning becomes noticeable; toss in a little lemon juice to slow oxidation if prepping ahead.
Recipe Variations: Try a tropical version with coconut ice cream, mango sauce, and toasted coconut flakes, or a "deconstructed" version served in a bowl for easier eating.
You'll also love: Easy & Decadent Small-Batch Cheesecake Recipe
4. Oreo Icebox Cake

Prep Time: 15 minutes | Chill Time: 6 hours (or overnight) | Servings: 12
Soft, cake-like layers form as Oreo cookies soak in whipped cream overnight — no oven required, and the texture transformation is genuinely magical. This is the dessert to make the night before your party and forget about until it's time to serve.
Ingredients:
3 packages Oreo cookies (regular, not double-stuffed)
3 cups heavy whipping cream
1/2 cup powdered sugar
1 tsp vanilla extract
Chocolate shavings or crushed Oreos, for garnish
Equipment Needed: Stand mixer or hand mixer, 9x13-inch dish or loaf pan, rubber spatula
Instructions:
Whip heavy cream, powdered sugar, and vanilla extract together until stiff peaks form.
Spread a thin layer of whipped cream on the bottom of your dish.
Arrange a single layer of whole Oreo cookies on top.
Spread a layer of whipped cream over the cookies, covering completely.
Repeat layering cookies and whipped cream until all ingredients are used, finishing with a whipped cream layer on top.
Cover and refrigerate for at least 6 hours, ideally overnight, to let the cookies soften into a cake-like texture.
Garnish with chocolate shavings or crushed Oreos before serving.
Serving Suggestions: Slice on the diagonal for a striped, bakery-style presentation. Pairs beautifully with fresh berries on the side.
Storage Tips: Keep covered in the refrigerator for up to 4 days. This dessert is not meant to be fully frozen — refrigeration creates the ideal soft, cakey texture.
Recipe Variations: Use peanut butter Oreos with a peanut butter whipped cream, or layer in sliced strawberries for a berries-and-cream version.
Shop This Recipe:
5. Strawberry Ice Cream Pie

Prep Time: 20 minutes | Freeze Time: 4 hours | Servings: 8
Bright, pink, and refreshing, this frozen strawberry pie uses a buttery graham cracker crust as the base for layers of softened strawberry ice cream and fresh berries. It is one of the prettiest desserts on this list and one of the easiest.
Ingredients:
1 pre-made graham cracker pie crust
1.5 quarts strawberry ice cream, slightly softened
1 cup fresh strawberries, sliced
1/2 cup strawberry sauce or jam, warmed slightly
Whipped cream, for topping
Fresh mint leaves, for garnish
Equipment Needed: Pie dish, rubber spatula, plastic wrap
Instructions:
Spread softened strawberry ice cream evenly into the graham cracker crust.
Smooth the top with a spatula.
Drizzle warmed strawberry sauce over the ice cream layer.
Arrange fresh sliced strawberries decoratively over the top.
Cover with plastic wrap and freeze for at least 4 hours, or until completely firm.
Top with whipped cream and mint leaves just before serving.
Serving Suggestions: Let the pie sit at room temperature for 5 minutes before slicing for clean cuts. A drizzle of white chocolate adds an elegant finish for adult gatherings.
Storage Tips: Wrap tightly and store in the freezer for up to 1 week. Add fresh strawberries only just before serving to prevent sogginess.
Recipe Variations: Swap strawberry for any seasonal fruit ice cream, or use an Oreo crust instead of graham cracker for a chocolate-strawberry combination.
🎙️ Treat yourself to a great love story while your pie firms up. That Love Podcast is streaming now: thatlovepodcast.com/episodes
6. Ice Cream Cookie Sandwiches

Prep Time: 15 minutes | Cook Time: 12 minutes (if baking cookies fresh) | Freeze Time: 2 hours | Servings: 12
Homemade beats store-bought every time with this one. Soft, slightly underbaked cookies sandwich a thick layer of ice cream, rolled in mini chocolate chips or sprinkles for a finishing touch that makes them irresistible to kids and adults alike.
Ingredients:
24 chocolate chip cookies (store-bought or homemade), slightly chilled
1.5 quarts ice cream of choice, softened
1 cup mini chocolate chips, sprinkles, or crushed nuts for rolling
Equipment Needed: Ice cream scoop, baking sheet lined with parchment, plastic wrap
Instructions:
Lay out half the cookies flat-side up on a parchment-lined baking sheet.
Scoop a generous portion of softened ice cream onto each cookie.
Top with a second cookie, pressing down gently until the ice cream reaches the edges.
Roll the exposed ice cream edges in mini chocolate chips, sprinkles, or crushed nuts.
Wrap each sandwich individually in plastic wrap.
Freeze for at least 2 hours until firm.
Serving Suggestions: Serve straight from the freezer for the best texture. These travel well, making them ideal for picnics and pool parties.
Storage Tips: Store wrapped sandwiches in a freezer bag for up to 2 weeks.
Recipe Variations: Use oatmeal cookies with cinnamon ice cream, or red velvet cookies with cream cheese ice cream for a more decadent option.
Shop This Recipe:
7. Chocolate Waffle Sundaes

Prep Time: 5 minutes | Cook Time: 10 minutes | Servings: 4
Warm, crisp chocolate waffles topped with melting ice cream create an irresistible hot-and-cold contrast that works just as well as a summer brunch dessert as it does for an after-dinner treat.
Ingredients:
4 frozen or fresh chocolate waffles
2 pints vanilla or chocolate ice cream
1/2 cup chocolate syrup
1/2 cup sliced strawberries or bananas
Whipped cream
Chopped pecans
Equipment Needed: Toaster or waffle iron, ice cream scoop
Instructions:
Toast or cook chocolate waffles until warm and crisp at the edges.
Place each waffle on a plate.
Top with one to two scoops of ice cream.
Drizzle generously with chocolate syrup.
Add fresh fruit, whipped cream, and chopped pecans.
Serve immediately while the waffle is still warm.
Serving Suggestions: Cut waffles into quarters for a shareable dessert platter at parties, or serve whole as an individual plated dessert.
Storage Tips: Best assembled fresh. Waffles can be made ahead and frozen, then reheated in a toaster just before serving.
Recipe Variations: Try a churro-style version with cinnamon sugar waffles and dulce de leche ice cream, or a peanut butter waffle sundae with chocolate ice cream and peanut butter drizzle.
You'll also love: Banana Bread Chocolate Chip Cookies Recipe
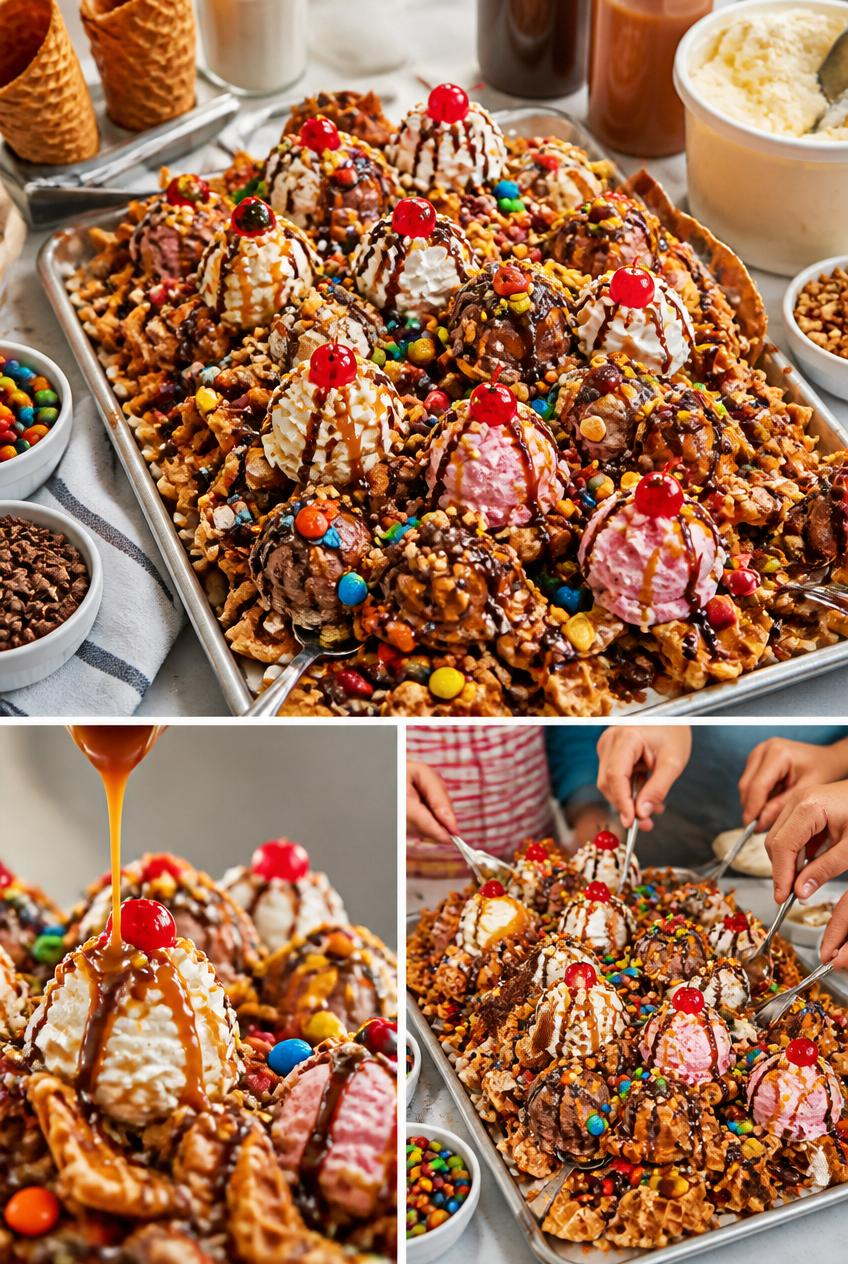
8. Ice Cream Nachos
Prep Time: 15 minutes | Servings: 6–8
The most fun, most shareable dessert on this entire list. Crunchy waffle cone pieces stand in for tortilla chips, while scoops of ice cream and a generous tumble of toppings create a dessert "nacho platter" guests cannot resist digging into together.
Ingredients:
6–8 waffle cones, broken into large chip-sized pieces
2 pints ice cream (a mix of flavors works best), softened slightly
1/2 cup chocolate sauce
1/2 cup caramel sauce
1/2 cup mini M&Ms or chopped candy bars
1/4 cup chopped nuts
Whipped cream
Maraschino cherries
Equipment Needed: Large serving platter or tray
Instructions:
Spread broken waffle cone pieces evenly across a large platter to form the "nacho" base.
Scoop spoonfuls of softened ice cream over the waffle pieces.
Drizzle generously with chocolate and caramel sauce.
Scatter mini M&Ms, chopped candy bars, and nuts over the top.
Finish with dollops of whipped cream and scattered cherries.
Serve immediately with spoons for sharing.
Serving Suggestions: This is best served family-style at the centre of the table for a party — guests can dig in together the way they would with traditional nachos.
Storage Tips: Assemble and serve immediately; this dessert does not store well once assembled due to the melting ice cream and softening waffle pieces.
Recipe Variations: Make individual portions in small bowls for guests with dietary restrictions, or create a "build your own" ice cream nacho bar with separate topping stations.
Shop This Recipe:
9. Peanut Butter Ice Cream Pie

Prep Time: 20 minutes | Freeze Time: 4 hours | Servings: 8
For peanut butter lovers, this is the holy grail of frozen desserts: a chocolate cookie crust filled with creamy peanut butter ice cream, finished with a layer of chocolate ganache and a scatter of chopped peanut butter cups.
Ingredients:
1 chocolate cookie pie crust (Oreo-style)
1.5 quarts peanut butter ice cream, softened
1/2 cup creamy peanut butter, slightly warmed
1/2 cup heavy cream
1/2 cup chocolate chips
Chopped peanut butter cups, for topping
Equipment Needed: Pie dish, microwave-safe bowl, rubber spatula
Instructions:
Spread softened peanut butter ice cream evenly into the chocolate cookie crust.
Drizzle warmed peanut butter over the top in a swirl pattern.
Freeze for 1 hour to set slightly.
Heat heavy cream until just simmering, then pour over chocolate chips in a bowl. Let sit 2 minutes, then stir until smooth to make ganache.
Pour the ganache over the peanut butter ice cream layer, spreading evenly.
Top with chopped peanut butter cups.
Freeze for at least 3 more hours, or until completely firm.
Serving Suggestions: Slice with a knife warmed under hot water for the cleanest cuts. Serve with a drizzle of extra warm peanut butter for true indulgence.
Storage Tips: Wrap tightly and freeze for up to 1 week.
Recipe Variations: Use chocolate ice cream instead of peanut butter for a classic chocolate-peanut butter combination, or add a layer of crushed pretzels for salty crunch.
🎙️ More than halfway through the list — stream That Love Podcast while you keep scrolling: thatlovepodcast.com/episodes
10. S'mores Ice Cream Cake

Prep Time: 25 minutes | Freeze Time: 5 hours | Servings: 12
All the nostalgic flavor of a campfire s'more, reimagined as a layered frozen cake. Graham cracker crumble, chocolate ice cream, and toasted marshmallow fluff come together for a dessert that tastes like summer camp in the best possible way.
Ingredients:
2 cups graham cracker crumbs
1/2 cup melted butter
1.5 quarts chocolate ice cream, softened
1 cup marshmallow fluff
1 cup mini marshmallows
1/2 cup chocolate chips, melted
Equipment Needed: Springform pan, kitchen torch (optional), rubber spatula
Instructions:
Mix graham cracker crumbs with melted butter and press into the bottom of a springform pan to form the crust.
Freeze the crust for 15 minutes to set.
Spread softened chocolate ice cream evenly over the crust.
Swirl marshmallow fluff through the ice cream layer with a knife.
Drizzle melted chocolate over the top.
Scatter mini marshmallows over the surface.
Freeze for at least 5 hours, or overnight.
If desired, lightly torch the marshmallows just before serving for an authentic toasted finish.
Serving Suggestions: Run a knife under hot water between slices for the cleanest cuts. The toasted marshmallow top makes for a beautiful presentation centerpiece.
Storage Tips: Store in the freezer, well wrapped, for up to 10 days. Toast marshmallows fresh just before serving rather than in advance.
Recipe Variations: Use vanilla ice cream with a swirl of chocolate sauce for a lighter version, or add crushed Hershey bars throughout the layers for extra chocolate.
Shop This Recipe:
11. Mini Ice Cream Cupcakes

Prep Time: 20 minutes | Freeze Time: 3 hours | Servings: 12
Individually portioned, endlessly customizable, and perfectly sized for a party where guests want their own personal treat rather than a shared slice. These mini ice cream cupcakes are made in a standard muffin tin and decorated like the real thing.
Ingredients:
12 chocolate sandwich cookies, crushed
3 tbsp melted butter
1.5 quarts ice cream of choice, softened
1 cup whipped cream (for frosting swirl)
Sprinkles, mini chocolate chips, or crushed candy for topping
Equipment Needed: Muffin tin, cupcake liners, piping bag (or zip-top bag)
Instructions:
Line a muffin tin with cupcake liners.
Mix crushed cookies with melted butter and press a spoonful into the bottom of each liner to form a crust.
Freeze for 10 minutes to set.
Fill each liner with softened ice cream, smoothing the top.
Freeze for at least 2 hours until firm.
Pipe whipped cream on top in a swirl pattern, mimicking traditional cupcake frosting.
Add sprinkles or toppings immediately before the whipped cream sets.
Freeze for another 30 minutes before serving.
Serving Suggestions: Display on a tiered cupcake stand for a birthday party. Each guest can grab their own without needing a knife or server.
Storage Tips: Store in the freezer in an airtight container for up to 1 week. Add the whipped cream swirl fresh if storing longer than a day.
Recipe Variations: Use different ice cream flavors in each cupcake for a variety platter, or add a small candle to one for a birthday surprise.
You'll also love: Simple & Delicious Orange Creamsicle Truffles You Must Try!
12. Fried Ice Cream

Prep Time: 20 minutes | Freeze Time: 2 hours | Servings: 6
This restaurant favorite is much easier to make at home than most people realize — and the "no-fry" version using crushed cereal delivers all the crunchy cinnamon flavor without the hassle (or risk) of actual deep frying.
Ingredients:
1.5 quarts vanilla ice cream
3 cups corn flakes cereal, crushed
1/3 cup melted butter
2 tsp ground cinnamon
3 tbsp sugar
Whipped cream, honey, and chocolate sauce for topping
Equipment Needed: Ice cream scoop, baking sheet, mixing bowl
Instructions:
Scoop 6 large balls of vanilla ice cream onto a parchment-lined baking sheet.
Freeze the scoops for at least 1 hour until very firm.
In a bowl, mix crushed corn flakes, melted butter, cinnamon, and sugar until evenly coated.
Spread the cinnamon-corn flake mixture on a plate.
Roll each frozen ice cream ball in the mixture, pressing gently so the coating sticks evenly.
Return coated balls to the freezer for another hour to firm up completely.
Serve drizzled with honey, chocolate sauce, and a dollop of whipped cream.
Serving Suggestions: Serve in individual bowls with a cherry on top for an authentic restaurant-style presentation.
Storage Tips: Store coated ice cream balls in a freezer bag for up to 1 week. Add sauces and whipped cream fresh at serving time.
Recipe Variations: Use crushed cinnamon graham crackers instead of corn flakes, or coat in crushed churro pieces for an even more authentic flavor.
13. Berry Ice Cream Parfaits

Prep Time: 10 minutes | Servings: 6
Light, refreshing, and beautifully presentable, these layered parfaits combine vanilla ice cream with fresh seasonal berries and crunchy granola for a dessert that feels a little lighter than the rest of this list — perfect for a hot afternoon.
Ingredients:
1.5 quarts vanilla or strawberry ice cream
2 cups mixed fresh berries (strawberries, blueberries, raspberries)
1 cup granola
1/2 cup honey or berry sauce
Fresh mint, for garnish
Equipment Needed: Tall glasses or parfait cups, ice cream scoop
Instructions:
Add a layer of granola to the bottom of each glass.
Add a scoop of ice cream on top of the granola.
Layer with a generous portion of fresh mixed berries.
Drizzle with honey or berry sauce.
Repeat the layers once more, finishing with berries on top.
Garnish with fresh mint and serve immediately.
Serving Suggestions: Serve in clear glasses to show off the colorful layers — ideal for a brunch or daytime garden party.
Storage Tips: Best assembled immediately before serving. Granola can be prepped in advance and stored in an airtight container.
Recipe Variations: Use Greek yogurt in alternating layers with the ice cream for a lighter version, or swap granola for crushed graham crackers for a more dessert-forward parfait.
Shop This Recipe:
🎙️ One more incredible recipe to go — stream That Love Podcast before we wrap up: thatlovepodcast.com/episodes
14. Ultimate DIY Sundae Bar

Prep Time: 15 minutes (setup) | Servings: 12+
The ultimate crowd-pleaser for any summer gathering: a full self-serve sundae station that requires almost no actual "recipe" but delivers maximum customization, maximum fun, and minimum stress for the host. Everyone builds their own perfect sundae, which means there is genuinely something for every guest.
Ingredients:
4 flavors of ice cream (vanilla, chocolate, strawberry, and cookies and cream are universally popular)
Sauces: hot fudge, caramel, strawberry sauce, marshmallow fluff
Toppings: sprinkles, mini M&Ms, crushed Oreos, chopped peanuts, mini marshmallows, gummy bears
Fresh fruit: sliced bananas, strawberries, pineapple chunks
Whipped cream and maraschino cherries
Waffle cone bowls or regular bowls
Equipment Needed: Large serving tray or board, small bowls for toppings, ice cream scoops (one per flavor to prevent cross-contamination), large bowl of ice with salt for keeping tubs cold outdoors
Instructions:
Set out small bowls for each topping, arranged on a large serving tray, board, or table.
Fill a large bowl or cooler with ice and sprinkle 2 tablespoons of salt over it to help keep ice cream tubs cold longer.
Nestle the ice cream tubs into the ice, leaving one scoop per tub to avoid cross-contamination.
Arrange sauces in small pitchers or squeeze bottles for easy drizzling.
Set out bowls, waffle cone bowls, and spoons nearby.
Let guests build their own sundaes, choosing flavors, sauces, and toppings freely.
Refill ice and toppings as needed throughout the party.
Serving Suggestions: Label each topping with small handwritten signs for a polished look. Group toppings into themes (a "cookie" station, a "fruit" station, a "candy" station) to make decision-making easier for guests.
Storage Tips: Keep unused ice cream tubs in the freezer until needed; only set out what will be consumed within an hour to avoid excess melting. Sealed toppings can be stored in the fridge or pantry and reused for the next gathering.
Recipe Variations: Theme the bar for holidays (red, white, and blue toppings for July 4th), create a waffle-bowl-only station, or add a "spaghetti sundae" surprise using a potato ricer to push vanilla ice cream into noodle shapes, topped with strawberry sauce "marinara" and white chocolate shavings "parmesan."
Shop This Recipe:
Conclusion
Summer entertaining does not need to mean hours in a hot kitchen — these 14 frozen ice cream desserts prove that some of the most memorable party treats are also the easiest to pull together. Whether you go all-in on a showstopping S'mores Ice Cream Cake, keep things simple with a classic Banana Split, or let your guests build their own creations at the Ultimate DIY Sundae Bar, every recipe on this list is designed to deliver maximum reward for minimum effort.
Pick one. Pick three. Or work your way through the entire list one summer party at a time. Your freezer — and your guests — will thank you.

💛 Enjoyed this? Support the content that brings you recipes like these: Donate to That Love Podcast
🎙️ Stream That Love Podcast — the perfect background for your next kitchen project: thatlovepodcast.com/episodes
💡 You May Also Love
If you're enjoying this blog, check out these other ones:
❓ Frequently Asked Questions
1. What is the easiest ice cream dessert to make for a large summer party? The Ultimate DIY Sundae Bar is the easiest option for large groups because it requires no actual baking or assembly — just setting out ice cream, toppings, and sauces and letting guests build their own. Ice Cream Sandwich Cake is the easiest "made dessert," requiring only stacking and freezing.
2. Can I make ice cream desserts the day before a party? Yes. Ice Cream Sandwich Cake, S'mores Ice Cream Cake, Strawberry Ice Cream Pie, Peanut Butter Ice Cream Pie, and Oreo Icebox Cake all benefit from being made a day ahead — the extra freezing or chilling time actually improves the texture and makes slicing cleaner.
3. How do I keep ice cream desserts from melting at an outdoor party? Keep frozen desserts in the freezer until the last possible moment before serving. For a sundae bar, nestle ice cream tubs into a large bowl or cooler filled with ice and a sprinkle of salt, which helps maintain a colder temperature for longer. Serve in smaller batches rather than setting out the full quantity at once.
4. What is the best dessert for a kids' birthday party? Mini Ice Cream Cupcakes are ideal for kids' parties because they are individually portioned, easy to decorate, and simple for children to eat without needing utensils. Ice Cream Sandwich Cake is also a strong choice for its broad appeal and easy slicing.
5. How long do frozen ice cream desserts last in the freezer? Most of the desserts on this list keep well for 1–2 weeks when wrapped tightly in plastic wrap or stored in an airtight container. Oreo Icebox Cake is the exception, as it is refrigerated rather than frozen and is best eaten within 4 days.
6. Can I make these recipes dairy-free or vegan? Yes. Nearly every recipe on this list can be adapted using dairy-free or vegan ice cream, dairy-free whipped topping, and vegan cookie or graham cracker alternatives. The technique and assembly remain exactly the same.
7. What ice cream flavors work best for a sundae bar? Vanilla, chocolate, strawberry, and cookies and cream are the most universally popular choices and pair well with almost any topping combination. Including one non-dairy option ensures guests with dietary restrictions are not left out.
8. How do I prevent fried ice cream from melting before the coating sets? Freeze the ice cream scoops for at least an hour until very firm before coating, and work quickly when rolling them in the cinnamon-cereal mixture. Returning the coated balls to the freezer immediately afterward for another hour ensures they hold their shape until serving.
9. What's the best way to transport an ice cream dessert to a party? Use an insulated cooler bag with ice packs for transport, and keep the dessert in its freezer-safe dish until you arrive. Ice Cream Sandwich Cake and S'mores Ice Cream Cake both travel particularly well because of their sturdy, cake-like structure.
10. Can I prep the toppings for a sundae bar in advance? Yes. Dry toppings like sprinkles, crushed cookies, nuts, and candy can be prepped and stored in sealed containers days in advance. Fresh fruit toppings should be sliced no more than a few hours before serving to maintain freshness and prevent browning.
For more frozen dessert inspiration and ice cream science, check out Serious Eats' guide to ice cream desserts for expert technique tips on achieving the smoothest, creamiest frozen treats every time.


.jpg)
.jpg)


.jpg)






Comments