






12 DIY Planters Perfect for Mom


Spring is in the air, the birds are chirping, and our thoughts are naturally turning toward the incredible women who raised us, nurtured us, and helped us bloom. When it comes to finding the perfect token of appreciation for Mother’s Day, store-bought items often fall short of expressing the deep, boundless gratitude we feel. There is something profoundly special, deeply intimate, and inherently loving about taking the time to craft a handmade gift. If your mother, grandmother, or maternal figure is someone who finds peace with her hands in the soil, you are in the right place.
Welcome to our ultimate guide to creating beautiful, bespoke, and budget-friendly DIY planters. In 2026, we are seeing a massive shift towards mindful gifting, sustainability, and bringing the beauty of nature indoors. From trending viral planter hacks that have taken social media by storm to timeless, elegant upcycled designs, these custom flower pots will elevate her indoor gardening game and add a stunning touch to her patio decor. Creating these homemade planters is not just an exercise in crafting; it is an act of love, a testament to your creativity, and a surefire way to present her with a gift she will cherish long after the spring gardening projects have finished.
If you love our content and want to help us keep sharing these detailed guides, DIY inspiration, and heartfelt relationship advice, please consider supporting us by donating here: https://www.thatlovepodcast.com/donate
Explore More from That Love Podcast:
12. The Upcycled Teacup Succulent Planter

There is an undeniable, timeless charm to vintage porcelain. If you are looking for easy crafts for mom that yield stunning, delicate results, the upcycled teacup succulent planter is a phenomenal starting point. This project merges the elegance of high tea with the resilient, low-maintenance beauty of succulents, resulting in a miniature garden that fits perfectly on a windowsill, a home office desk, or a bedside table. It is one of the most delightful DIY gifts for plant lovers who appreciate a touch of nostalgia and whimsy.
The Crafting Process: To begin this project, you will need to source a vintage teacup and saucer set. Thrift stores, estate sales, and antique shops are goldmines for finding beautifully patterned, mismatched, or ornate porcelain sets at incredibly low prices. The most crucial step in transforming a teacup into a functional indoor plant pot is creating drainage. Succulents despise sitting in water, and without a drainage hole, the roots will quickly succumb to rot.
You will need a power drill equipped with a diamond-tipped or carbide drill bit specifically designed for glass and ceramic. Place a piece of masking tape over the bottom of the teacup to prevent the drill bit from slipping. Add a few drops of water to the drilling area to keep the bit cool, apply gentle, even pressure, and slowly drill a hole through the base. Once the hole is drilled, place a small piece of mesh or a coffee filter over it to keep the soil from falling out. Fill the cup with a well-draining cactus or succulent soil mix. Carefully nestle a small succulent—such as an Echeveria, Haworthia, or a string of pearls—into the soil. Finish it off by adding a top dressing of fine gravel or decorative pebbles to give it a polished, professional look.
Why Mom Will Love It: This personalized gift for her is dripping with sentimentality. If you can find a teacup that matches her existing china or features her favorite flower, it elevates the gift entirely. It acts as a beautiful, living piece of DIY home decor that requires very little maintenance, making it the perfect plant mom gift for women with busy schedules.
Where to Buy Your Materials: You can source the diamond drill bits, specialized succulent soil, and decorative pebbles directly from your local hardware store or by searching for "succulent potting supplies" on Amazon.
Listen to the That Love Podcast here for more heartfelt inspiration: https://www.thatlovepodcast.com/episodes
11. The Trending Disco Ball Hanging Planter

If your mother loves a bit of glamour, sparkle, and 1970s nostalgia, you absolutely must try your hand at the viral disco ball hanging planter. This has been one of the most explosive trending planter ideas of the last few years, completely dominating interior design mood boards. When the morning sunlight hits the mirrored facets of this planter, it scatters hundreds of tiny, dancing reflections across the room, turning an ordinary morning coffee routine into a magical, luminous experience.
The Crafting Process: You have two routes for this project: upcycling an actual disco ball or creating one from scratch using a plastic or foam hemisphere. If you are upcycling, purchase a hollow 8-inch or 10-inch disco ball. Wearing heavy-duty safety gloves and protective eyewear, carefully use a craft knife or a small saw to slice off the top quarter of the ball. You will likely lose a few mirror tiles in the process, so keep some extra adhesive handy to patch up the rim. Once the top is removed, scoop out the styrofoam core to create a cavity large enough for a plastic nursery pot.
If you are building from scratch, you will need a smooth, round plastic bowl or a half-sphere craft mold. Purchase sheets of self-adhesive square mirror mosaic tiles. Starting from the bottom center, painstakingly wrap the mirrored tiles around the bowl in even, horizontal rows until the entire surface is covered in reflective glory. To hang it, drill three small holes evenly spaced around the rim, attach metal S-hooks, and string it up using a durable silver or macrame chain.
Why Mom Will Love It: It is bold, it is joyful, and it brings an incredible amount of light into her indoor gardening spaces. A disco ball planter looks exceptionally beautiful when paired with trailing plants like a Neon Pothos, a Philodendron Brasil, or a String of Hearts, as the vibrant green vines cascading over the silver mirrors create a stunning visual contrast.
Where to Buy Your Materials: For the best selection of self-adhesive mirror mosaic tiles and sturdy hanging chains, head over to Michaels Craft Store and browse their extensive DIY craft aisles.
10. The Faux-Terracotta Baking Soda Painted Pot

Not all of us have the budget to buy high-end, artisan ceramics, but thanks to the magic of the internet, we have access to incredible viral planter hacks. The faux-terracotta baking soda paint technique is a brilliant, budget-friendly gardening trick that transforms cheap, glossy plastic pots or mismatched glass vases into stunning, matte, textured masterpieces that look like they were unearthed from an ancient Tuscan villa.
The Crafting Process: The secret ingredient to this transformation is ordinary baking soda from your kitchen pantry. Begin by selecting an upcycled planter—this could be a plastic container, an old glass jar, or an outdated ceramic pot. Lightly sand the surface of your container to give the paint something to grip. In a disposable bowl, mix your acrylic paint with baking soda. The ratio is typically one part baking soda to two parts paint, but you can adjust this depending on how much texture you desire. The baking soda reacts with the paint, creating a thick, fluffy, almost mousse-like consistency.
Use a wide bristle brush or a sponge to apply the mixture to your pot. Instead of painting in smooth, straight strokes, dab and stipple the paint onto the surface to create a rough, earthy, handmade ceramic texture. For an authentic terracotta look, mix burnt sienna, a touch of mustard yellow, and a drop of white. You can also experiment with muted sage greens, dusty roses, or stark whites for a more modern, minimalist look. Allow the first coat to dry completely before applying a second coat. Once dry, seal it with a matte, waterproof spray sealant to protect it from moisture.
Why Mom Will Love It: This technique yields beautiful plant containers that look astonishingly expensive. It fits seamlessly into modern, boho, or rustic home garden ideas. It shows that you put time, effort, and creative ingenuity into crafting a piece of beautiful decor just for her.
Where to Buy Your Materials: You can buy standard acrylic paints, baking soda, and matte sealant sprays at any major retailer, craft store, or easily order them via Amazon's craft and hobby section.
Related Article from That Love Podcast: Looking for a fantastic, character-driven romance to pair with your creative afternoon? Check out this deep dive into an unforgettable story: Book Review: Heated Rivalry by Rachel Reid – A Sizzling Enemies-to-Lovers Romance That Scores Big
9. The Customized Family Photo Decoupage Planter

If you are searching for handmade gifts for mom that will absolutely bring tears to her eyes, the customized family photo decoupage planter is the ultimate heartfelt project. Mother’s Day is inherently about celebrating family, memories, and the passage of time. By integrating cherished family photographs directly onto a planter, you are giving her a functional piece of art that serves as a daily reminder of her loved ones.
The Crafting Process: To start, you will need a smooth, plain terracotta pot or a clean, white ceramic planter. Next, gather your favorite family photos. To ensure the photos adhere properly and look seamless, it is best to print them on thin, regular printer paper rather than thick, glossy photo paper. You can print them in full color, or convert them to black and white or sepia for a vintage, timeless aesthetic. Carefully cut out the images.
Clean the surface of the pot thoroughly. Apply a generous layer of Mod Podge (a popular decoupage medium) to the area of the pot where you want the photo. Gently press the photo onto the wet Mod Podge, smoothing out any air bubbles or wrinkles from the center outward using your fingers or a soft brayer. Once the photo is perfectly positioned, apply another layer of Mod Podge directly over the top of the photo to seal it. You can create a collage of overlapping photos covering the entire pot, or feature one beautiful, prominent family portrait. Allow the Mod Podge to dry completely (it will dry clear). Because planters will inevitably be exposed to water, it is absolutely critical that you finish this project by applying two to three coats of a clear, heavy-duty, outdoor-grade waterproof sealant.
Why Mom Will Love It: It is deeply personal. Every time she waters her favorite indoor plant pots, she will be greeted by the smiling faces of her children, grandchildren, or beloved pets. It is the very definition of personalized gifts for her, elevating a simple gardening item into a precious family heirloom.
Where to Buy Your Materials: You can pick up Mod Podge, foam brushes, and clear acrylic waterproof sealers from any local craft supply store like Joann Fabrics or order them online through major retailers.
8. The Boho Macrame Plant Hanger with Glass Bowl
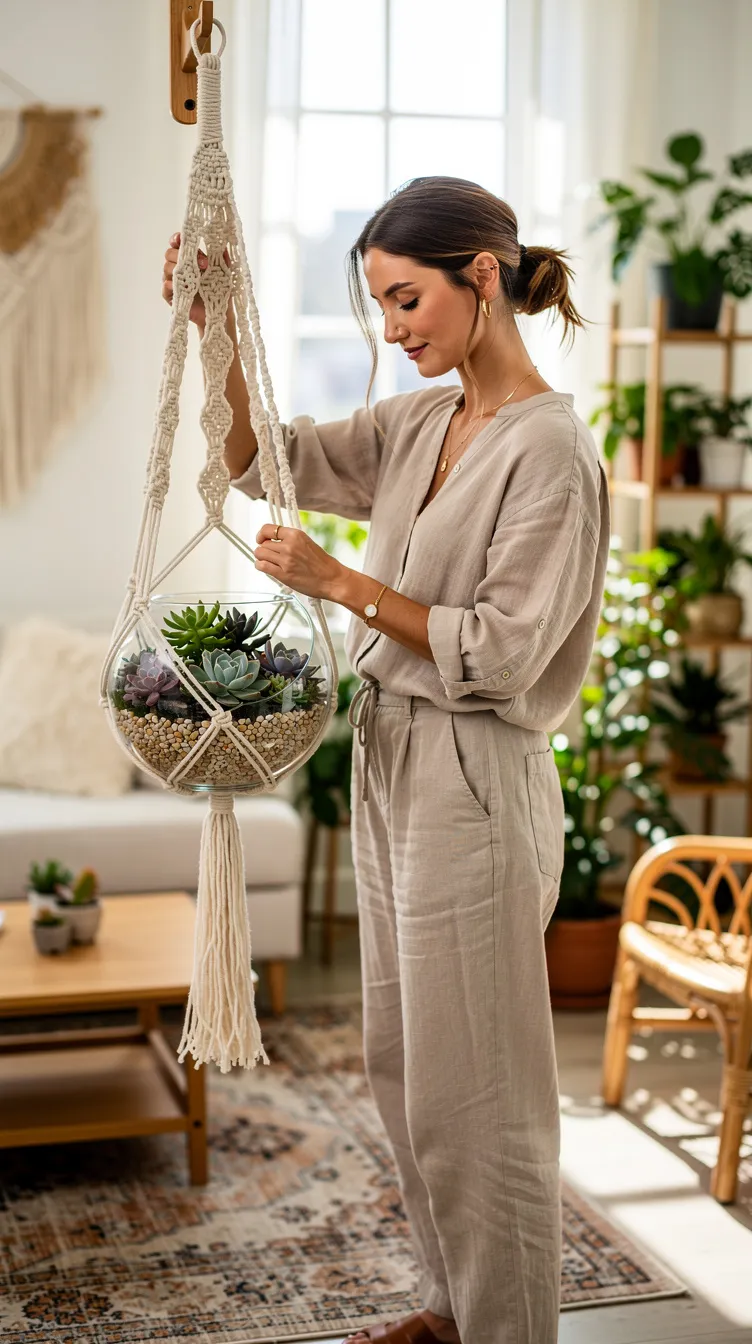
Macrame has experienced a massive resurgence, reclaiming its throne as the ultimate bohemian DIY home decor element. While buying a pre-made hanger is easy, hand-tying a macrame plant hanger is a rhythmic, therapeutic craft that results in a gorgeous, custom piece. Paired with a glass bowl for a unique, modern twist, this project takes the traditional hanging planter to new heights.
The Crafting Process: You will need high-quality, 3mm or 4mm cotton macrame cord, a wooden or metal ring for hanging, and a round glass bowl (often sold as terrarium bowls or fish bowls). Cut four long lengths of cord (usually about 8 to 10 feet each, depending on how long you want the hanger). Fold all the cords in half and loop them through the wooden ring, securing them with a strong gathering knot at the top. You now have eight working cords.
Divide the cords into four pairs. Measure down about 15 inches from the top knot, and tie a simple overhand knot in each of the four pairs. Next, measure down another 4 to 5 inches. Take one cord from the first pair and tie it to the adjacent cord from the second pair. Repeat this process around the circle to create an alternating, net-like diamond pattern. Repeat this knotting process one more time further down. Finally, gather all eight cords together at the bottom and secure them tightly with another gathering knot, leaving a lovely tassel at the end. Slip your glass bowl into the nested net you've created.
Why Mom Will Love It: The macrame plant hanger offers a stunning way to display trailing plants, air plants, or a beautiful, layered succulent terrarium within the glass bowl. It frees up valuable counter space and draws the eye upward, adding vertical interest and a relaxed, earthy, bohemian vibe to her home garden ideas.
Where to Buy Your Materials: Find an array of colored and natural cotton macrame cords, wooden rings, and glass terrarium bowls by searching for "macrame DIY starter kits" on Amazon or at specialty craft websites.
7. The Modern Concrete-Look Minimalist Planter

Industrial minimalism is a dominating force in contemporary interior design. Real concrete planters are breathtakingly beautiful, but they are incredibly heavy, difficult to move, and expensive to ship. Luckily, you can create the exact same brutalist, modern aesthetic using lightweight materials and faux-finish techniques. This concrete planters DIY is perfect for the mom who loves sleek lines, neutral palettes, and modern architectural design.
The Crafting Process: Start with a lightweight, inexpensive foundation—a large plastic planter, a heavily textured cardboard box, or even a foam cooler if you are ambitious. To create the faux-concrete texture, you have two options. The first is to use a textured stone-effect spray paint. Simply take your plastic planter to a well-ventilated outdoor area and apply several even coats of gray, stone-textured spray paint.
The second, more authentic-looking method involves using actual joint compound or skim coat (used for drywall repair). Apply a thin, uneven layer of the joint compound all over the outside of your plastic planter using a putty knife or your fingers (wear gloves). You don't want it to be perfectly smooth; the ridges, bumps, and imperfections mimic the porous, raw nature of poured concrete. Once the compound is completely dry, lightly sand down any sharp peaks. Paint the planter with a mixture of light gray, dark gray, and white matte acrylic paints, sponging the colors on to create a mottled, realistic cement look. Seal it with a matte waterproofing spray.
Why Mom Will Love It: This project allows you to create massive, large outdoor planters or statement indoor pieces that look like they cost a fortune at a high-end design boutique, but are light enough for her to easily move around the patio. It provides a striking, neutral backdrop that makes the vibrant green foliage of her plants pop brilliantly.
Where to Buy Your Materials: For joint compound, drywall tools, and stone-texture spray paint, head over to The Home Depot or your local hardware and home improvement store.
Listen to the That Love Podcast here for a cozy break during your crafting session: https://www.thatlovepodcast.com/episodes
6. The Self-Watering Wine Bottle Herb Garden

Is your mom a culinary enthusiast who loves having fresh herbs on hand, but struggles to remember to water them every day? The self-watering wine bottle herb garden is an ingenious, upcycled planters project that solves the watering dilemma using basic physics, all while looking incredibly chic and environmentally conscious.
The Crafting Process: This project requires careful handling, as you will be cutting glass. You will need an empty, clean wine bottle, a glass cutting tool (a score-and-snap jig), boiling water, and ice water. First, score a continuous line around the circumference of the wine bottle, about halfway down. Next, alternate pouring a stream of boiling hot water and ice-cold water directly over the score line. The thermal shock will cause the glass to cleanly snap along the line. Use coarse sandpaper to thoroughly smooth down the sharp, cut edges of both halves.
Take the top half of the bottle (the part with the neck) and invert it so the neck points downward. Cut a long piece of thick cotton string or a strip of an old cotton t-shirt to act as a wick. Thread the string through the neck of the bottle so it hangs down. Fill the inverted top half with soil, ensuring the string runs up through the center of the dirt, and plant your chosen herb (like basil, thyme, or mint). Fill the bottom half of the glass bottle with water, and place the top half inside it. The cotton wick will draw water up into the soil via capillary action exactly when the plant needs it.
Why Mom Will Love It: It is a brilliant piece of functional art. These cheap DIY planters take the guesswork out of watering delicate herbs, ensuring they stay perfectly hydrated on her kitchen windowsill. Plus, it is a fantastic way to recycle the bottles from her favorite wines, combining sustainability with style.
Where to Buy Your Materials: You can purchase safe, easy-to-use glass bottle cutter kits on Amazon, along with specialized herb seeds and potting soil.
Related Article from That Love Podcast: Take a moment to explore another beautiful story of navigating grief, identity, and grace in our detailed review: We Are Okay by Nina LaCour Book Review: A Quiet Queer Anthem of Grief and Grace
5. The Scalloped-Edge Clay Planter
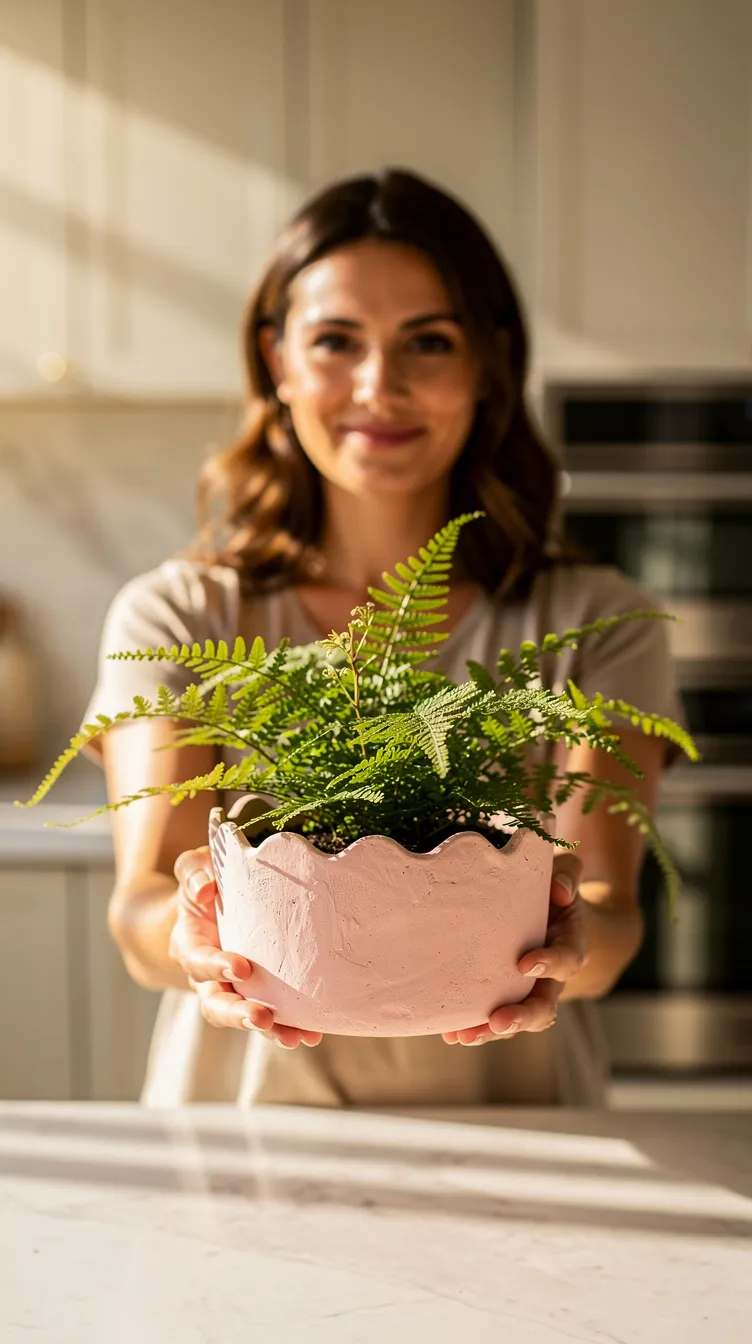
For a touch of soft, feminine, and playful design, the scalloped-edge clay planter is an absolute must-try. Scalloped edges have become a massive trend in fashion, furniture, and ceramics, bringing a sweet, cottagecore aesthetic to modern spaces. Using air-dry clay, you can mold and shape a beautifully unique plant pot without needing access to a professional kiln.
The Crafting Process: You will need a block of high-quality air-dry clay, a rolling pin, a craft knife, and a cylindrical object (like a clean tin can, a PVC pipe, or a straight-sided jar) to act as your structural mold. Roll out your clay on a non-stick surface until it is about 1/4 inch thick. Cut a circular base for the bottom of your planter. Next, roll out a long rectangular strip that will wrap around your mold to form the walls.
Before attaching the walls, use a craft knife or a small circular cookie cutter to cut a wavy, scalloped pattern along the top edge of the rectangular strip. Carefully wrap the clay strip around your mold, joining the seams by scoring the edges and applying a little water to merge the clay. Attach the scalloped walls to the circular base. Carefully slide the mold out (or leave it in if you are using an upcycled tin can that you want to permanently cover). Let the clay dry completely for 24-48 hours. Once dry, sand away any rough edges. Paint it in a beautiful, soft pastel—like blush pink, butter yellow, or mint green—and seal it heavily with a waterproof varnish.
Why Mom Will Love It: The scalloped edge adds a delicate, artisanal touch that feels incredibly special. It is perfect for housing small indoor plants like ferns, nerve plants, or colorful polka dot plants. It is one of those beautiful plant containers that look like a designer boutique find, showcasing your dedication to hand-crafted excellence.
Where to Buy Your Materials: Air-dry clay (such as DAS brand), rolling pins, acrylic paints, and clay sculpting tools are readily available at major craft retailers or online craft marketplaces.
4. The Vintage Tin Can & Twine Rustic Pot
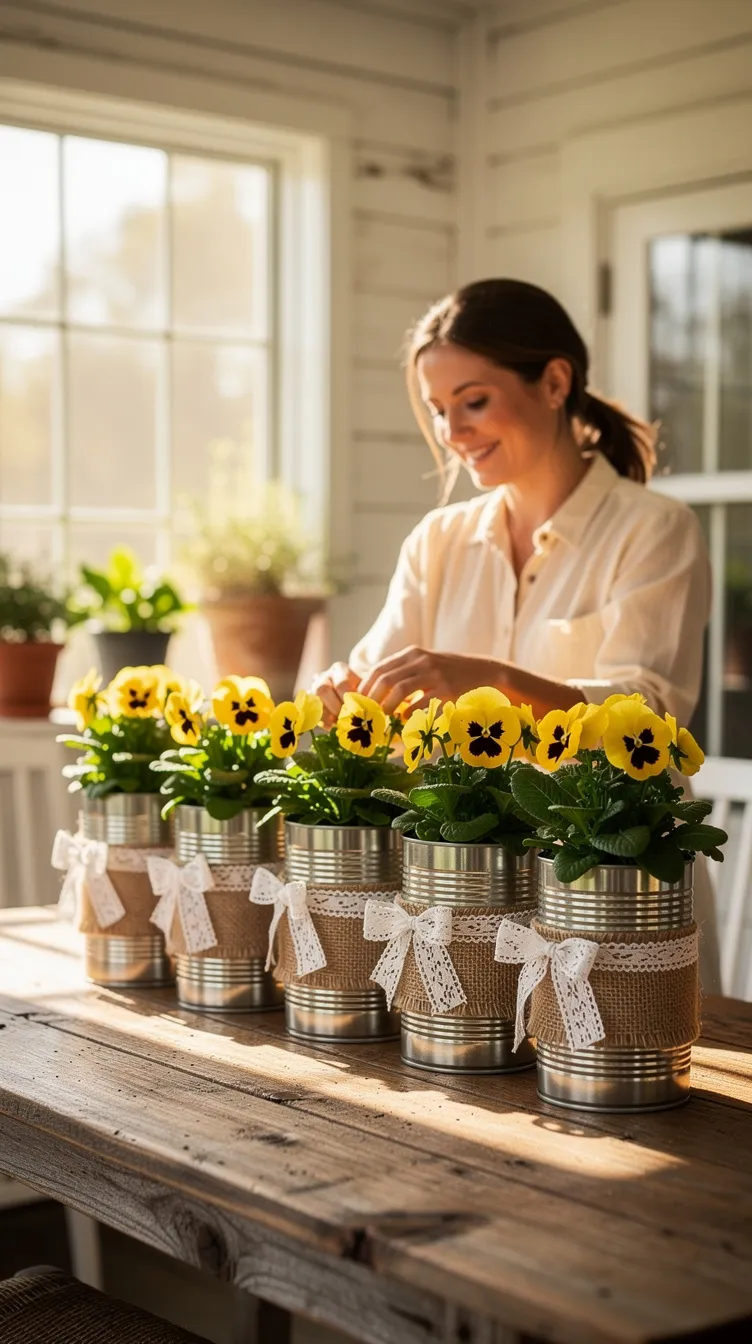
Sometimes, the most charming crafts are the simplest ones. If your mother’s decor style leans toward farmhouse chic, rustic country, or shabby-chic, the vintage tin can and twine rustic pot is an incredibly easy, budget-friendly, and highly effective DIY project. It transforms everyday recycling bin materials into warm, textured patio decor.
The Crafting Process: Rescue a few large tin cans (from crushed tomatoes, coffee, or soup) from your recycling bin. Clean them thoroughly, remove the labels, and ensure there are no sharp edges at the rim. Use a hammer and a large nail to punch three to four drainage holes in the bottom of the can.
Take a spool of thick, natural jute twine or sisal rope. Apply a line of hot glue around the bottom edge of the can and attach the end of the twine. Slowly and tightly begin wrapping the twine around the can, moving upwards, applying small dabs of hot glue every few inches to keep it secure. Continue wrapping until the entire metallic surface of the can is covered in rustic, brown twine. To embellish the pot, you can tie a strip of delicate white lace around the center, glue on some wooden buttons, or use a stencil and some white paint to dab a vintage farmhouse design (like a bumblebee or a French floral motif) directly onto the twine.
Why Mom Will Love It: These handmade gifts for mom are unpretentious, incredibly sturdy, and offer wonderful textural warmth to her gardening displays. They look absolutely gorgeous lined up on a rustic wooden porch, filled with brightly colored spring blooms like pansies, marigolds, or trailing lobelia.
Where to Buy Your Materials: Jute twine, hot glue guns, and vintage-style lace ribbons can be found cheaply at any dollar store, hardware store, or craft supply shop.
3. The Ribbed Upcycled Plastic Bottle Planter
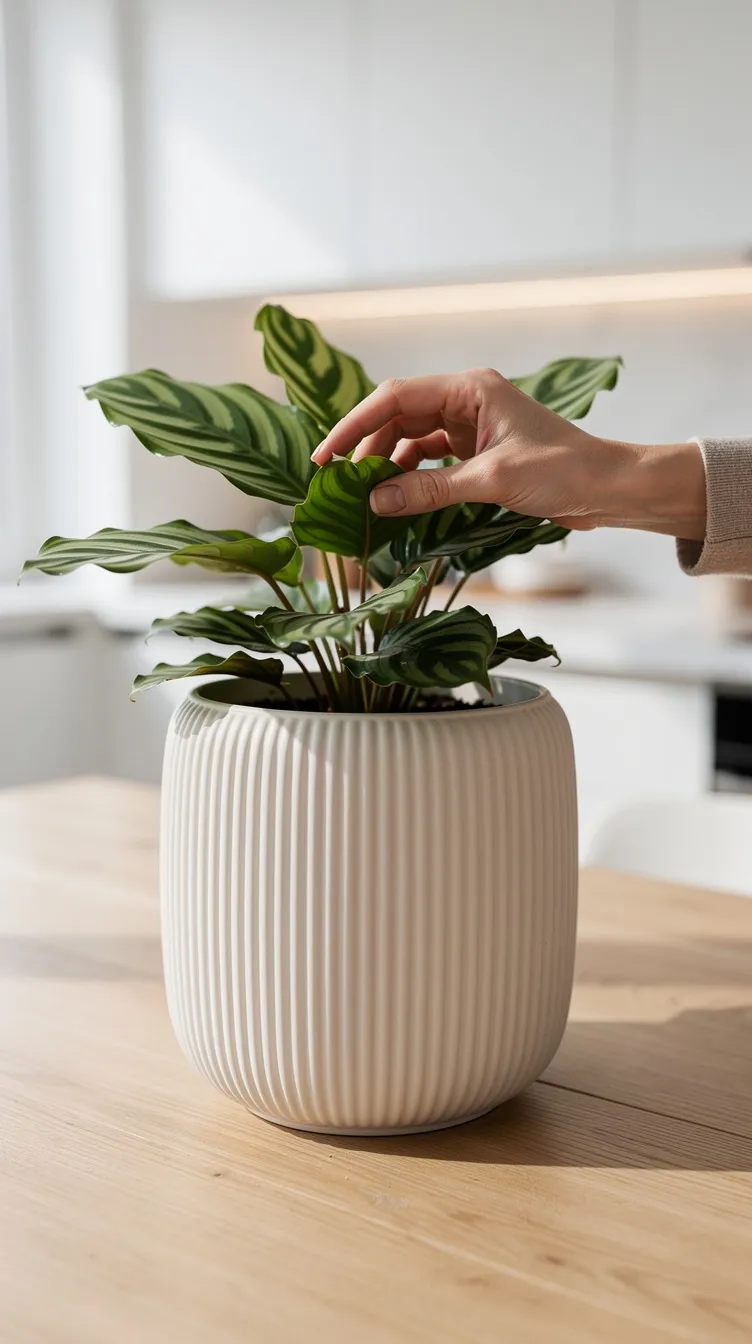
Texture is everything in modern interior design, and ribbed or fluted surfaces are highly sought after. You can create a stunning, architectural, ribbed planter using little more than an empty two-liter plastic soda bottle and some wooden craft dowels or paper straws. This project is the epitome of clever upcycling, turning trash into absolute treasure.
The Crafting Process: Take a clean, empty plastic soda bottle or a large juice container and cut off the top half, leaving you with a deep, straight-sided plastic cylinder. Be sure to poke a few drainage holes in the bottom. Next, you will need a large pack of wooden half-dowels (flat on one side, rounded on the other) or sturdy, thick paper straws cut to the exact height of your plastic container.
Using a hot glue gun or heavy-duty construction adhesive, begin gluing the flat side of the wooden dowels (or the straws) vertically against the outside of the plastic bottle. Place them tightly side-by-side, covering the entire circumference of the bottle. This will completely hide the plastic and create a beautiful, continuous ribbed texture. Once the adhesive is dry, paint the entire structure. A matte terracotta, a stark matte black, or a creamy off-white spray paint works beautifully. The paint unifies the dowels and makes the piece look like a solid, heavy ceramic structure. Seal it with a clear, protective topcoat.
Why Mom Will Love It: This ribbed design looks identical to high-end, 3D-printed, or designer fluted ceramics that cost hundreds of dollars. It brings a sophisticated, architectural element to her indoor gardening setup, proving that cheap DIY planters can look incredibly luxurious with the right creative vision.
Where to Buy Your Materials: Wooden half-dowels, heavy-duty craft adhesive, and premium spray paints are widely available at hobby stores or hardware centers.
Related Article from That Love Podcast: Enjoying your crafting journey? Take a break and immerse yourself in another brilliant, romantic book review: The Book Club Boyfriend by Kendall Ryan Book Review: When the Queen of Anti-Romance Meets Her Match
2. The Hand-Painted Floral Terracotta Masterpiece

Taking the runner-up spot on our list is a classic project that allows for boundless creativity: the hand-painted terracotta pot. Terracotta pots are inexpensive, excellent for plant health due to their porous nature, and serve as the perfect blank canvas. By painting a custom floral design, you are creating a one-of-a-kind piece of art that reflects your mother's unique personality and favorite botanicals.
The Crafting Process: Because terracotta is highly porous, it will soak up paint and moisture, which can cause your design to peel over time if not prepped correctly. You must first seal the inside of the pot with an aerosol clay sealer; this prevents moisture from the wet soil from seeping through and destroying your artwork on the outside. Next, prime the outside of the pot with a layer of white or pastel acrylic primer.
Once primed, let your imagination run wild. You can paint delicate, trailing vines, vibrant sunflowers, abstract mid-century modern shapes, or even a detailed portrait of her favorite garden flower. If you aren't confident in your freehand painting skills, you can use stencils or painters tape to create crisp, geometric color-blocking. After your masterpiece is completely dry, apply two coats of a high-quality, UV-resistant, clear outdoor polyurethane sealer to protect the colors from fading in the sun or chipping from water exposure.
Why Mom Will Love It: This is the ultimate expression of handmade love. Painted terracotta pots are deeply personal gifts. Every brushstroke is a testament to the time and thought you invested in her present. It adds a brilliant pop of color and custom art to her patio decor or windowsill.
Where to Buy Your Materials: Basic terracotta pots are incredibly cheap at any garden center. For the best acrylic paints and sealers, look online or visit your local craft supply. Need design inspiration?
Tune into the That Love Podcast one more time before we reveal the number one planter: https://www.thatlovepodcast.com/episodes
1. The Grand Terrazzo-Style Indoor Plant Pot

Taking the number one spot on our list of DIY planters perfect for Mom is the exquisite, sophisticated, and incredibly trendy Terrazzo-style indoor plant pot. Terrazzo—a composite material consisting of chips of marble, quartz, granite, or glass poured with a cementitious binder—is a hallmark of Italian design and has taken the modern decor world by storm. You can recreate this luxurious, speckled look at home using polymer clay and a plain base pot, resulting in a show-stopping, grand planter that will leave her speechless.
The Crafting Process: This project requires a bit of patience, but the payoff is magnificent. You will need a plain, straight-sided ceramic or metal planter to act as your base, various colors of oven-bake polymer clay (like Sculpey or Fimo), a rolling pin, and a craft knife.
First, create your "terrazzo chips." Take small amounts of your colored clay (mustard yellow, navy blue, blush pink, and terracotta make a stunning modern palette) and chop them irregularly into tiny, jagged, confetti-like pieces. Next, take a large block of your base color clay (usually white or cream) and roll it out flat into a large sheet. Sprinkle your colored clay chips randomly all over the white sheet. Use your rolling pin to firmly roll over the chips, pressing them deep into the white clay until the surface is flat and the chips are embedded, creating that signature terrazzo pattern.
Carefully lift your terrazzo clay sheet and wrap it smoothly around the outside of your base planter. Trim away the excess clay at the top and bottom so it fits perfectly flush. Bake the entire planter in the oven according to the polymer clay package instructions to harden it. Once baked and cooled, use a fine-grit sandpaper to wet-sand the surface of the clay. This crucial step removes any thin layers of white clay covering the chips, revealing the crisp, vibrant colors beneath and creating a smooth, stone-like finish. Finally, seal it with a glossy varnish.
Why Mom Will Love It: This is a premium, high-end design that looks like it was purchased from an exclusive architectural boutique. It is an extraordinary, unique plant pot that elevates her indoor gardening to the level of fine art. The terrazzo aesthetic is joyful, colorful, and wildly chic, making it the absolute best Mother's Day gift for a mother who loves modern, sophisticated DIY home decor.
Where to Buy Your Materials: You can find an array of beautiful polymer clay colors, acrylic rollers, and varnishes by searching for "polymer clay starter kits" on Amazon or at local craft retailers.
Conclusion
There is an old saying that the best gifts are not bought, but made. When you dedicate your time, energy, and creativity to crafting something by hand, you are giving a piece of yourself. This Mother's Day, stepping away from the standard bouquet of flowers and presenting her with one of these stunning DIY planters is a surefire way to make her feel profoundly seen and appreciated.
Whether you choose the vintage charm of the upcycled teacup succulent, the glamorous sparkle of the disco ball hanger, or the architectural beauty of the faux-concrete minimalist pot, you are providing her with a gift that will literally grow and flourish over time. These DIY gifts for plant lovers are more than just containers for dirt; they are vessels of love, testaments to your creativity, and beautiful additions to her sanctuary.

So roll up your sleeves, gather your materials, and get ready to craft a masterpiece. Happy crafting, and Happy Mother’s Day to all the wonderful, nurturing, and beautiful plant moms out there!
If you found this guide inspiring and want to support our writers and creators, please consider making a donation here: https://www.thatlovepodcast.com/donate
Keep the love, creativity, and conversation flowing by listening to our latest podcast episodes here: https://www.thatlovepodcast.com/episodes
More Incredible Reads from That Love Podcast:
10 FAQs About DIY Planters and Gardening
1. What is the most important thing to remember when making a DIY planter? Drainage! Without a doubt, drainage is the most critical element. If water cannot escape the bottom of the pot, the roots of the plant will sit in stagnant water, leading to root rot and ultimately killing the plant. Always drill holes in the bottom of your DIY containers or use the "cachepot" method (placing a plastic nursery pot with holes inside a decorative pot without holes).
2. Can I use regular indoor acrylic paint for outdoor planters? If the planter will be kept outside, standard acrylic paint will quickly chip and wash away in the rain. You must use outdoor-grade acrylics or heavily seal your painted planter with two to three coats of an exterior-grade, UV-resistant polyurethane waterproof sealant.
3. What are the best plants to put in small DIY planters like teacups? Small, shallow planters are best suited for slow-growing succulents (like Echeveria, Zebra plants, or Lithops), air plants (Tillandsia), or small cacti. They have shallow root systems and require very little water.
4. How do I prevent my painted terracotta pots from blistering? Terracotta is highly porous and absorbs water from the soil inside. When that water tries to evaporate through the outside of the pot, it pushes the paint off, causing blisters. To prevent this, thoroughly spray the inside of the terracotta pot with a waterproof clay sealer before planting.
5. What is the cachepot method? The cachepot method involves keeping your plant in its ugly, plastic nursery pot (which has excellent drainage) and simply placing that plastic pot inside your beautiful, decorative DIY planter. When it's time to water, you remove the plastic pot, water it in the sink, let it drain completely, and put it back.
6. Are disco ball planters bad for the plants inside them? The mirrored outside does not harm the plant. However, disco balls are usually made of plastic or styrofoam, which are not breathable materials. Therefore, you must use a well-draining soil mix and be careful not to overwater, as the moisture cannot evaporate through the walls like it does with clay.
7. How do I clean and maintain a macrame plant hanger? Cotton macrame can gather dust. The best way to clean it is to take it outside and gently shake it, or use a sticky lint roller to pick up dust. If it gets stained, spot clean it with a mild mixture of warm water and gentle dish soap, allowing it to air dry completely.
8. What kind of soil should I use for a self-watering wine bottle planter? Because the wick constantly draws water up, the soil will remain consistently moist. Use a high-quality, lightweight potting mix blended with a generous amount of perlite or pumice to ensure the soil stays aerated and doesn't become heavy and waterlogged.
9. Can I make planters entirely out of air-dry clay? Yes, but with a major caveat: air-dry clay is not naturally waterproof. If you plant directly into unsealed air-dry clay, the water from the soil will turn the clay back to mush. You must heavily seal the inside and outside of the clay pot with a waterproof varnish, or use it solely as a cachepot.
10. What is the easiest DIY planter project for beginners? The faux-terracotta baking soda painted pot (Project #10) is incredibly forgiving, requires no special tools like drills or glass cutters, and actively relies on a messy, textured application. It is perfect for absolute beginners!
For more extensive, expert advice on plant care, soil mixtures, and seasonal gardening tips to fill your new DIY planters, visit the master gardeners over at The Old Farmer's Almanac.



.jpg)





.jpg)


