11 Heartfelt DIY Beach Souvenirs to Capture Your Summer Memories
- Joao Nsita
- Jul 25, 2025
- 15 min read


The rhythm of the waves, the warmth of the sun on your skin, the thrill of discovering a perfectly formed seashell nestled in the sand – these are the moments that define a perfect beach day. But what happens when the holiday ends and the salty air becomes a distant memory? While photographs capture the views, there’s a unique magic in creating a tangible keepsake, a piece of the shore you can hold in your hand. This is the art of the beach souvenir, and the most cherished ones are often those we craft ourselves.
In a world saturated with mass-produced trinkets, the act of creating a DIY beach souvenir is a powerful way to connect with your memories on a deeper level. It’s a mindful process that transforms natural treasures into personal talismans, each one whispering a story of a specific time and place. This comprehensive guide will walk you through 11 imaginative and heartfelt DIY beach souvenirs, offering step-by-step instructions, creative variations, and helpful tips to ensure your creations are as beautiful and enduring as the memories they represent. Whether you're a seasoned crafter or a curious beginner, you'll find a project that speaks to your heart and captures the essence of your seaside adventures.
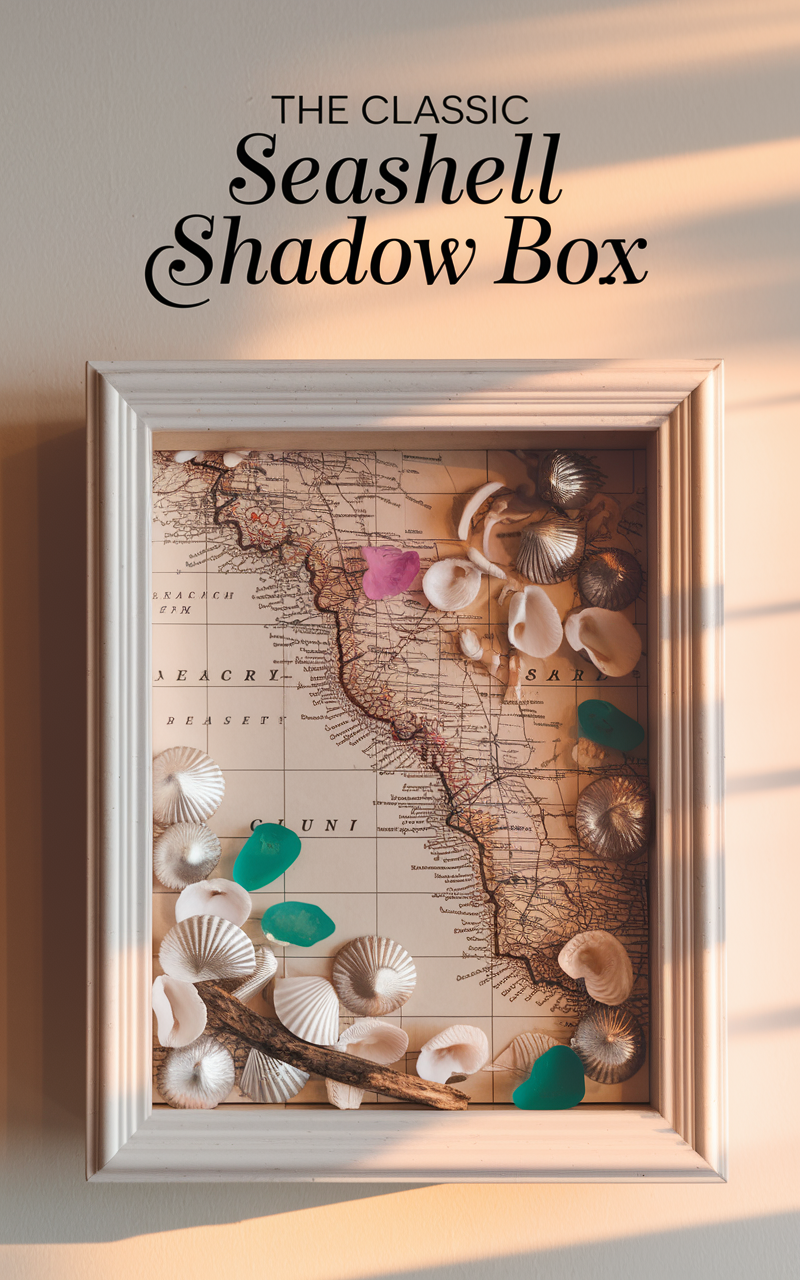
1. The Classic Seashell Shadow Box
A shadow box is a timeless way to display a curated collection of your beach finds. It transforms a simple assortment of shells, sea glass, and driftwood into a stunning piece of wall art that tells a story.
Why We Love It: A shadow box allows you to create a mini-museum of your beach trip, preserving the unique character of each find while presenting them in a cohesive and elegant display.
Materials You'll Need:
A shadow box frame (available at craft stores in various sizes and finishes)
Your collection of beach treasures (seashells, sea glass, small pieces of driftwood, pebbles, dried seaweed)
A piece of cardstock or scrapbook paper for the background (a map of the beach you visited is a creative option)
A hot glue gun or strong craft adhesive
Tweezers for placing small items
Sand from the beach (optional)
Step-by-Step Instructions:
Clean Your Treasures: Begin by thoroughly cleaning all your beach finds. Rinse them in fresh water and let them air dry completely. For stubborn dirt on shells, use a soft brush.
Prepare the Shadow Box: Open the back of the shadow box and remove the backing. If you're using a decorative paper background, cut it to size and glue it to the inside of the backing.
Arrange Your Composition: Before you start gluing, lay your beach treasures on the backing to create a pleasing arrangement. Play with different layouts until you find one you love. Consider creating a pattern, a scene, or a more organic, scattered look.
Secure Your Items: Once you're happy with your composition, begin gluing your items in place. Use a small amount of hot glue or craft adhesive on the back of each item and press it firmly onto the backing. Use tweezers for smaller, more delicate items.
Add Sand (Optional): If you'd like to include sand, you can either sprinkle a thin layer on the bottom of the shadow box before placing the backing or mix it with a clear-drying craft glue to create a textured background.
Reassemble and Display: Carefully place the backing back into the shadow box and secure it. Your beautiful beach memory box is now ready to be hung on a wall or displayed on a shelf.
Creative Variations:
Themed Shadow Box: Create a shadow box with a specific theme, such as "Sunrise Shells" or "Driftwood Dreams."
Layered Look: Use small pieces of foam board to elevate some of your items, creating a more dimensional and dynamic display.
Personal Touches: Include a small, handwritten label with the name of the beach and the date of your visit. You could also add a small photo from your trip.

2. Ethereal Sea Glass Wind Chimes
Capture the gentle music of the sea with a set of ethereal wind chimes made from your sea glass collection. The soft clinking of the glass in the breeze is a soothing reminder of the waves.
Why We Love It: This project transforms sharp-edged remnants into a delicate and beautiful piece of kinetic art that engages both the eyes and the ears.
Materials You'll Need:
A collection of sea glass (the more, the better!)
A piece of driftwood to serve as the top of the wind chime
A small drill with a diamond-tipped bit (essential for drilling glass)
Clear fishing line or nylon thread
Scissors
A screw eye hook for hanging
Step-by-Step Instructions:
Prepare Your Materials: Clean your sea glass and driftwood. Select a piece of driftwood that is sturdy enough to support the weight of the sea glass.
Drill the Sea Glass: This is the most delicate step. Fill a shallow dish with water to keep the glass and drill bit cool. Submerge a piece of sea glass in the water and slowly and gently drill a small hole near the top of each piece. Do not apply too much pressure, as the glass can crack.
Drill the Driftwood: Drill a series of small holes along the bottom of the driftwood, where you will hang the strands of sea glass.
String the Sea Glass: Cut several lengths of fishing line. Tie a secure knot at the bottom of the first piece of sea glass. Thread the line up through the hole and then add more pieces of sea glass, tying a knot below each one to keep them in place. Vary the number of sea glass pieces on each strand to create a more interesting look.
Attach the Strands to the Driftwood: Thread the top of each fishing line strand through a hole in the driftwood and tie a secure knot.
Create a Hanger: Screw the eye hook into the top of the driftwood. Tie a longer piece of fishing line to the eye hook for hanging.
Creative Variations:
Add Shells: Drill holes in some of your smaller shells and incorporate them into your wind chime strands.
Color Gradient: If you have a variety of sea glass colors, arrange them in a gradient for a stunning visual effect.
Beaded Accents: Add small beads in complementary colors between the pieces of sea glass for extra sparkle.

3. Rustic Driftwood Photo Frame
Frame your favorite beach photo with the very essence of the shoreline. A driftwood photo frame is a rustic and charming way to display your memories.
Why We Love It: This project is a beautiful example of upcycling, turning weathered wood into a functional and deeply personal piece of home decor.
Materials You'll Need:
A simple, inexpensive photo frame with a flat surface
A collection of small to medium-sized pieces of driftwood
A hot glue gun or strong wood glue
Your favorite beach photo
Step-by-Step Instructions:
Clean the Driftwood: Make sure your driftwood is clean and completely dry.
Prepare the Frame: Remove the glass and backing from the photo frame.
Arrange the Driftwood: Lay the pieces of driftwood around the frame, playing with different arrangements until you find a look you like. You can have the pieces all going in the same direction or create a more random, textured pattern.
Glue the Driftwood: Once you're happy with the arrangement, start gluing the driftwood pieces onto the frame. Apply a generous amount of glue to each piece and press it firmly onto the frame.
Let it Dry: Allow the glue to dry completely before handling the frame.
Add Your Photo: Place your photo in the frame, followed by the glass and the backing.
Creative Variations:
Whitewashed Finish: For a more coastal, shabby-chic look, give your driftwood a light coat of whitewash paint before gluing it to the frame.
Shell Accents: Glue a few small shells or pieces of sea glass in between the driftwood pieces for added detail.
Varying Sizes: Use a mix of long, thin pieces and shorter, chunkier pieces of driftwood to create a more dynamic and interesting texture.

4. Ocean in a Bottle Necklace
Carry a tiny piece of the ocean with you wherever you go with this enchanting "ocean in a bottle" necklace.
Why We Love It: This miniature world is a whimsical and deeply personal souvenir that is surprisingly easy to make.
Materials You'll Need:
A small glass bottle with a cork stopper (available at craft stores)
Fine sand from the beach
Tiny seashells
A small jump ring and a necklace chain
Clear-drying craft glue
Optional: Blue food coloring and baby oil or water
Step-by-Step Instructions:
Fill with Sand: Carefully pour a small amount of sand into the glass bottle.
Add Shells: Use tweezers to place your tiniest seashells on top of the sand.
Create the "Ocean" (Optional): If you want to create the illusion of water, mix a drop of blue food coloring with a small amount of baby oil or water and carefully pour it into the bottle.
Seal the Bottle: Apply a small amount of clear-drying glue to the cork and insert it firmly into the bottle. Let it dry completely.
Attach the Jump Ring: Screw a small eye hook into the top of the cork. Open the jump ring, loop it through the eye hook, and then attach it to your necklace chain.
Creative Variations:
Glittery Sand: Mix a small amount of iridescent glitter with the sand for a touch of magic.
Personalized Message: Write a tiny message on a small piece of paper, roll it up, and place it inside the bottle before sealing.
Sea Glass Chips: Instead of shells, use tiny chips of sea glass.


5. Decorative Seashell Candles
Infuse your home with the warm glow of the beach by creating your own seashell candles.
Why We Love It: This project is both beautiful and functional, creating a cozy, coastal ambiance in any room.
Materials You'll Need:
Large, deep seashells (scallop or clam shells work well)
Soy wax flakes
Candle wicks with metal bases
A heatproof container for melting the wax (a glass measuring cup works well)
A saucepan
Optional: Candle dye and fragrance oil (ocean or coconut scents are perfect)
Step-by-Step Instructions:
Prepare the Shells: Make sure your shells are clean and dry.
Melt the Wax: Fill a saucepan with a few inches of water and bring it to a simmer. Place the soy wax flakes in your heatproof container and place it in the saucepan. Stir the wax until it is completely melted.
Add Color and Scent (Optional): If you're using candle dye or fragrance oil, add it to the melted wax and stir well.
Place the Wicks: Dip the metal base of each wick into the melted wax and place it in the center of a seashell. The wax will help it stick in place.
Pour the Wax: Carefully pour the melted wax into the seashells, making sure the wick stays centered.
Let Them Cool: Allow the candles to cool and harden completely before trimming the wicks to about a quarter of an inch.
Creative Variations:
Layered Colors: Pour different colored layers of wax, allowing each layer to cool slightly before adding the next.
Glitter Top: Sprinkle a small amount of fine glitter on top of the wax before it completely hardens.
Gift Set: Make a set of three or four seashell candles and tie them together with a ribbon for a beautiful handmade gift.

6. Sea Glass Mosaic Tray
Create a stunning and practical piece of art for your home with a sea glass mosaic tray.
Why We Love It: This project turns a collection of sea glass into a functional work of art that is perfect for serving drinks or displaying decorative items.
Materials You'll Need:
A plain wooden tray
A collection of sea glass
Clear-drying craft glue or tile adhesive
White grout
A sponge and a soft cloth
A putty knife or craft stick
Optional: Acrylic paint to paint the tray
Step-by-Step Instructions:
Prepare the Tray: If you wish, paint the tray in a color that complements your sea glass and let it dry completely.
Arrange the Sea Glass: Lay out your sea glass on the tray to create your desired pattern.
Glue the Sea Glass: Once you're happy with the design, glue each piece of sea glass in place. Let the glue dry completely.
Apply the Grout: Mix the grout according to the package directions. Spread the grout over the sea glass, using a putty knife to press it into all the gaps.
Clean the Surface: After about 15-20 minutes, use a damp sponge to gently wipe the excess grout off the surface of the sea glass.
Let it Haze and Buff: Allow the grout to dry for a couple of hours until a haze forms on the sea glass. Then, use a soft, dry cloth to buff the haze off the glass. Let the grout cure completely for a few days before using the tray.
Creative Variations:
Ombré Effect: Create a beautiful ombré effect by arranging your sea glass from light to dark.
Incorporate Shells: Add a few small shells to your mosaic for extra texture and interest.
Picture Frame Mosaic: Use the same technique to create a stunning sea glass mosaic picture frame.

7. Sand-Filled Christmas Ornaments
Bring a touch of the beach to your Christmas tree with these charming sand-filled ornaments.
Why We Love It: This simple yet beautiful craft allows you to relive your summer memories during the festive season.
Materials You'll Need:
Clear glass or plastic fillable ornaments
Fine sand from the beach
Tiny seashells and other small beach treasures
A small funnel
Ribbon for hanging
Optional: A paint pen to write the year and location on the ornament
Step-by-Step Instructions:
Fill with Sand: Use a funnel to pour a layer of sand into the ornament.
Add Treasures: Carefully drop your tiny seashells and other small treasures into the ornament.
Secure the Top: Place the metal top back on the ornament.
Add a Ribbon: Thread a piece of ribbon through the top of the ornament for hanging.
Personalize (Optional): Use a paint pen to write the name of the beach and the year on the outside of the ornament.
Creative Variations:
Layered Sand: If you have sand from different beaches, create layers of different colored sand in your ornament.
Glittery Snow: Add a pinch of iridescent glitter to the sand to create a "snowy" beach scene.
Photo Ornament: Print a tiny photo from your trip, roll it up, and place it inside the ornament.

8. Seashell-Adorned Mirror
Transform a plain mirror into a stunning piece of coastal decor with a frame of beautiful seashells.
Why We Love It: This project is a fantastic way to make a bold statement and bring a touch of mermaid-inspired glamour to any room.
Materials You'll Need:
A mirror with a plain, flat frame
A large collection of seashells in various shapes and sizes
A hot glue gun or strong epoxy adhesive
Optional: Pearl beads or small pieces of sea glass
Step-by-Step Instructions:
Clean Your Shells: Ensure all your shells are clean and dry.
Plan Your Design: Arrange your shells around the mirror frame to get an idea of the layout. It's often best to start with the larger shells and then fill in the gaps with smaller ones.
Glue the Shells: Start gluing the shells onto the frame, working in small sections. Apply a generous amount of glue to each shell and press it firmly in place.
Fill in the Gaps: Use your smaller shells, pearl beads, or sea glass to fill in any gaps between the larger shells.
Let it Dry: Allow the glue to dry and cure completely before hanging the mirror.
Creative Variations:
Monochromatic Look: Use only white shells for a chic and sophisticated look.
Patterned Design: Create a pattern with your shells, such as a scallop or wave design.
Full Coverage: For a truly dramatic look, cover the entire frame with shells, leaving no part of the original frame visible.

9. Beach Terrarium
Create a miniature, self-contained beach scene in a glass container. A beach terrarium is a beautiful and low-maintenance way to display your seaside finds.
Why We Love It: This living piece of art brings a touch of nature indoors and can be customized in endless ways.
Materials You'll Need:
A clear glass container (a jar, a vase, or a terrarium vessel)
Sand
Small pebbles or gravel
Your collection of beach treasures (shells, driftwood, sea glass)
An air plant (Tillandsia) – these don't require soil and are perfect for terrariums
Optional: A small piece of moss
Step-by-Step Instructions:
Create a Base Layer: Start by adding a layer of pebbles or gravel to the bottom of your container for drainage.
Add Sand: Pour a generous layer of sand on top of the pebbles.
Arrange Your Treasures: Place your larger pieces of driftwood and shells in the sand to create the main structure of your scene.
Add the Air Plant: Nestle the air plant into the sand.
Add Details: Sprinkle smaller shells and sea glass around the scene. You can also add a small piece of moss for a touch of green.
Care: Place your terrarium in a spot with bright, indirect light. To water the air plant, simply remove it from the terrarium once a week, soak it in water for about 20 minutes, and then let it dry completely before returning it to the terrarium.
Creative Variations:
Layered Sand Art: Use different colors of sand to create beautiful layers in your terrarium.
Miniature Beach Scene: Add tiny beach chairs or other miniature accessories to create a whimsical scene.
Hanging Terrarium: Use a hanging glass orb to create a beautiful floating beach terrarium.

10. Seashell Hair Accessories
Adorn your hair with the beauty of the sea by creating your own seashell hair accessories.
Why We Love It: These simple yet elegant accessories are a beautiful way to carry a piece of the beach with you and add a touch of mermaid chic to any hairstyle.
Materials You'll Need:
Small, beautiful seashells
Hair clips, bobby pins, or a headband
A hot glue gun or strong epoxy adhesive (like E6000)
Optional: Small pearls or glitter
Step-by-Step Instructions:
Choose Your Shells: Select small, lightweight shells that will be comfortable to wear in your hair.
Glue the Shells: Apply a small amount of glue to the back of a shell and press it firmly onto the hair accessory.
Let it Dry: Allow the glue to dry completely before wearing.
Creative Variations:
Mermaid Crown: Glue a variety of shells onto a sturdy headband to create a stunning mermaid crown.
Bobby Pin Set: Create a set of bobby pins, each with a different tiny shell.
Pearl Accents: Add a small pearl next to the shell for a touch of elegance.

11. Driftwood and Shell Wall Hanging
Create a beautiful and bohemian-inspired piece of wall art with a driftwood and shell wall hanging.
Why We Love It: This project combines the rustic beauty of driftwood with the delicate charm of seashells to create a stunning piece of coastal decor that is full of texture and movement.
Materials You'll Need:
A piece of driftwood
A collection of shells
A small drill with a fine-tipped bit
String or twine
Scissors
Step-by-Step Instructions:
Drill the Shells: Carefully drill a small hole in each of your shells.
Cut the String: Cut several lengths of string or twine.
String the Shells: Tie a shell to the end of each string and then thread more shells onto the string, tying knots to keep them in place.
Attach to Driftwood: Tie the top of each string to the piece of driftwood, spacing them out evenly.
Create a Hanger: Tie a longer piece of string to both ends of the driftwood for hanging.
Creative Variations:
Incorporate Sea Glass: Add pieces of drilled sea glass to your wall hanging for a pop of color.
Macrame Details: If you know macrame, you can incorporate some simple knots into your wall hanging for added texture.
Feather Accents: Add a few feathers to the ends of your strings for a more bohemian look.
Conclusion
The souvenirs you bring back from the beach are more than just objects; they are vessels of memory, tangible connections to moments of peace, joy, and discovery. By taking the time to transform your beachcombing finds into handmade treasures, you are not only creating beautiful and unique pieces of decor but also weaving your personal stories into the very fabric of your home. Each glance at your seashell shadow box, each gentle chime of your sea glass wind chime, will transport you back to the shore, to the sun, sand, and surf. So the next time you walk along the water's edge, see the treasures at your feet not just as shells and stones, but as the raw materials for your next creative adventure.

Frequently Asked Questions (FAQs)
1. How do I properly clean my beach finds? To clean seashells and driftwood, soak them in a solution of one part bleach to ten parts water for a few hours to sanitize them and remove any algae or barnacles. Then, rinse them thoroughly with fresh water and let them air dry completely in the sun. For sea glass, a simple wash with soap and water is usually sufficient.
2. What's the best way to drill holes in seashells and sea glass without breaking them? The key is to use a small rotary tool or drill with a diamond-tipped bit. Work slowly and apply gentle, steady pressure. It's also crucial to keep the shell or glass wet while drilling to prevent overheating and cracking; drilling in a shallow dish of water is an effective technique.
3. What is the best type of glue for beach crafts? For most projects involving shells and driftwood, a hot glue gun provides a quick and strong bond. For projects that require a more durable and waterproof hold, such as the sea glass mosaic tray or outdoor wind chimes, a strong epoxy adhesive like E6000 is recommended.
4. Is it legal to take shells, sand, and driftwood from the beach? Laws vary significantly by location. Many public beaches allow for the collection of a small number of unoccupied shells and stones for personal use. However, it is often illegal to take sand, and collecting from protected areas like national parks or marine sanctuaries is typically prohibited. Always check local regulations before you collect.
5. How can I get a "sea-washed" look on wood I already have? You can create a faux driftwood effect by lightly sanding a piece of wood and then applying a "whitewash" – a mixture of one part white latex paint and one part water. Brush it on, then wipe most of it off with a clean cloth, allowing some of the white to settle into the grain.
6. My sea glass looks dull after washing. How can I make it shine again? To restore the shiny, "wet" look to sea glass, you can rub a tiny amount of baby oil or coconut oil onto its surface with a soft cloth. This will enhance its color and give it a beautiful luster.
7. How do I get the fishy smell out of seashells? Soaking the shells in a bleach and water solution (as mentioned in FAQ 1) is the most effective way to eliminate any lingering odors. Allowing them to dry completely in the sun will also help.
8. Can I use beach sand for craft projects? Yes, but it's important to clean and dry it first. Rinse the sand with fresh water multiple times to remove salt and impurities, then spread it out on a baking sheet and bake it in the oven at a low temperature (around 120°C or 250°F) for an hour or two to ensure it's completely dry and sanitized.
9. Are there any eco-friendly considerations for beach crafting? Absolutely. The most important rule is to only take unoccupied shells and to leave the beach cleaner than you found it. Avoid taking anything that appears to be part of a living ecosystem, such as coral or live sand dollars. When crafting, opt for non-toxic glues and paints whenever possible.
10. I have very small children. Are there any beach souvenir crafts that are safe for them? Yes! A simple and safe activity for young children is creating "sand art" by drawing a picture with glue on a piece of cardstock and then sprinkling sand over it. They can also paint larger, smoother rocks and shells with non-toxic, water-based paint. The sand-filled Christmas ornament is also a great option with adult supervision.


.jpg)


Comments